

Introduction
If you wish to add animation to any of the components in the web page, all those animations or modifications to an element to behave in a certain way are done by manipulating the DOM.
The Document Object Model usually referred it as the DOM, is an essential part of making websites interactive. It is an interface that represents how your HTML and XML documents are read by the browser. It allows JavaScript to manipulate, structure and style your website. After the browser reads your HTML document, it creates a representational tree called the Document Object Model and defines how that tree can be accessed.
What is the DOM?
At the most basic level, a website consists of an HTML document. The browser that you use to view the website is a program that interprets HTML and CSS and renders the style, content and structure into the page that you see.
In addition to parsing the style and structure of the HTML and CSS, the browser creates a representation of the document known as the Document Object Model. This model allows JavaScript to access the text content and elements of the website document as objects.
Advantages of DOM:
By manipulating the DOM, you have infinite possibilities. You can create applications that update the data of the page without needing a refresh. Also, you can create applications that are customizable by the user and then change the layout of the page without a refresh. You can drag, move and delete elements.
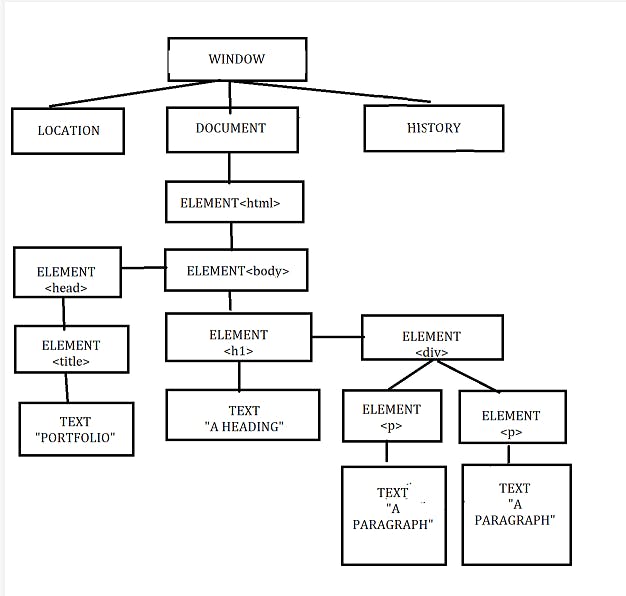
In the image above, we can see the representational tree and how it is created by the browser. In this example, we have four important elements that you are going to see:
Document: It treats all HTML documents.
Elements: All the tags that are inside your HTML or XML turn into a DOM element.
Text: All the tag's content.
Attributes: All the attributes from a specific HTML element. In the image, the attribute class="hero" is an attribute from the <p> element.
The Document Object:
A document object is a built-in object that has many properties and methods that we can use to access and modify websites.
What is the difference between the DOM and HTML source code?
There are two instances in which the browser-generated DOM will be different from the HTML source code.
The DOM is modified by client-side JavaScript
The browser automatically fixes errors in the source code.
<body>
    <h1>Document Object Model</h1>
</body>
returns document.body as output
document is an object, body is a property of that object that we have accessed with dot notation. Submitting the document.body to the console would output the body element and everything inside of it.
In the console, we can change some of the live properties of the body object on this website.
document.body.style.backgroundColor= 'fuchsia';
DOM TREE:
The backbone of an HTML document is tags. According to the Document Object Model(DOM), every HTML tag is an object. Nested tags are "children" of the enclosing one. The text inside a tag is an object as well. All these objects are accessible using JavaScript and we can use them to modify the page. Running the below code will make the body red for 3 secs.
document.body.style.background = 'red';
setTimeout(() => document.body.style.background = '', 3000);
Here we used style.background to change the background color of document.body, but there are many other properties such as
innerHTML - HTML contexts of the node.
offsetWidth - the node width in pixels.
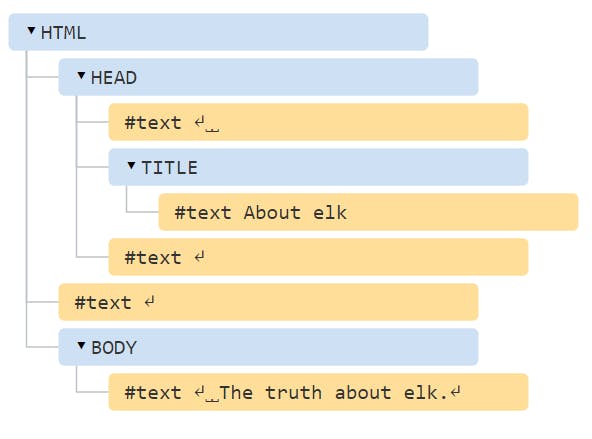
Every tree node is an object. Tags are element nodes and form the tree structure. <html> is at the root, then <head> and <body> are its children.
The text inside elements form "text nodes", labeled as #text. A text node contains only a string. It may not have children and is always a lead of that tree. Spaces and newlines are valid characters like letters and digits. They form text nodes and become a part of the DOM.
Manipulating the DOM:
To manipulate the DOM, we first create an HTML element as an example to see some methods and how events work.
<!DOCTYPE html>
<html lang="pt-br">
<head>
    <meta charset="UTF-8">
    <meta name="viewport" content="width=device-width, initial-scale=1.0">
    <meta http-equiv="X-UA-Compatible" content="ie=edge">
    <title>DOM-Document Object Model</title>
</head>
<body>
    <div class="container">
        <h1><time>00:00:00</time></h1>
        <button id="start">Start</button>
        <button id="stop">Stop</button>
        <button id="reset">Reset</button>
    </div>
</body>
</html>
Methods:
The DOM has a lot of methods. They are the connection between our nodes(elements) and events.
getElementById()
This method returns the element that contains the name id passed. The id here should be unique and you get only one element.
innerHtml is used to access the content of an element.
<html>
<head>
    <title>DOM!!!</title>
</head>
<body>
  <h1 id="one">Welcome</h1>
  <p>This is the welcome message.</p>
  <h2>Technology</h2>
  <p>This is the technology section.</p>
  <script type="text/javascript">
        var text = document.getElementById("one").innerHTML;
        alert("The first heading is " + text);
  </script>
</body>
</html>
In case we do not have any id with a specific name, it returns null.
getElementsByClassName()
This method returns an HTMLCollection of all those elements containing the specific name class passed.
var myContainer = document.getElementByClassName('container');
myContainer is the variable that holds the elements returned. '.container' is the class passed. In case we not have any class with that specific classname, it returns null.
getElementsByTagName()
This works the same way as those methods above: it also returns an HTMLCollection, but this time with single difference: it returns all those elements with the tag name passed.
<html>
<head>
    <title>DOM!!!</title>
</head>
<body>
  <h1>Welcome</h1>
  <p>This is the welcome message.</p>
  <h2>Technology</h2>
  <p id="second">This is the technology section.</p>
  <script type="text/javascript">
    var paragraphs = document.getElementsByTagName("p");
    alert("Content in the second paragraph is " + paragraphs[1].innerHTML);
    document.getElementById("second").innerHTML = "The orginal message is changed.";
  </script>
</body>
</html>
querySelector():
It returns the first element that has the specific CSS selector passed. Just remember that the selector should follow the CSS syntax. In case you do not have any selector, it returns null
var resetButton = document.querySelector('#reset');
querySelectorAll()
Similar to the querySelector() method, but with a single difference: it returns all the elements that match the CSS selector passed. The selector should also follow the CSS syntax. In case you do not have any selector that matches, it returns null.
These are the most used DOM methods. There are several more methods that you can use like the createElement() which creates a new element in your HTML page and setAttribute() which lets you set new attributes for elements in HTML.
Events:
The DOM elements have methods but also they have events. These events are responsible for making interactivity possible on our page.
click
One of the most used events is the click event. When the user clicks on a specific element, it will do a particular action
<html>
<head>
    <title>DOM!!!</title>
</head>
<body>
  <input type="button" id="btnClick" value="Click Me!!" />
  <script type="text/javascript">
    document.getElementById("btnClick").addEventListener("click", clicked);
    function clicked()
    {
            alert("You clicked me!!!");
    }
  </script>
</body>
</html>
The addEventListener() parameters are:
The type of event that you want.
A callback function
The useCapture by default is false. it indicates whether or not you want to "capture" the event.
select
This event is used when you want to dispatch something when a specific element is selected.
myStart.addEventListener('select', function(event) {
    alert('Element Selected');
},false);
These are some of the events. We have a lot of other events that you can use, like drag & drop events- when a user starts to drag some element you can make some action, and when they drop that element you can make another action.
Traversing the DOM
A good JavaScript developer needs to know how to traverse the DOM- it's the act of selecting an element from another element.
Why do we traverse?
Let's say you want to go to your neighbor's house. What's the fastest and most efficient way to get there?
Move from your house to their house (since you already know the address)
Look up their address on Google maps, then walk according to the directions Google gives you.
If you move directly from your house to their house, you are doing the equivalent if traversing the DOM- selecting one element from a neighboring element.
If you look up their address on Google, you are doing equivalent to "document.querySelector" to find elements.
You can traverse in three directions:
Downwards
Sideways
Upwards
Traversing Downward:
There are two methods to traverse downward:
querySelector or querySelectorAll
children
querySelector or querySelectorAll:
To traverse downwards from a specific element, you can use element.querySelector or element.querySelectorAll.
<div class="component">
    <h2 class="component__title">Component Title</h2>
</div>
const component = document.querySelector('.component');
const title = component.querySelector('.component__title');
console.log(title);
// <h2 class="component__title">...</h2>
CHILDREN:
children is a property that lets you select direct descendants (elements that are immediately nested in another element). It returns a HTML Collection that updates when children elements that are changed.
<ul class="list">
    <li><a href="#">Link 1</a></li>
    <li><a href="#">Link 2</a></li>
    <li><a href="#">Link 3</a></li>
    <li><a href="#">Link 4</a></li>
    <li><a href="#">Link 5</a></li>
</ul>
const list = document.querySelector('.list');
const listItems = list.children;
console.log(listItems);
An HTML Collection is similar to a NodeList. An HTML collection is an array-like object. If you want to loop over it with Array.prototype.forEach, you need to convert it into an array with Array.from list.
const array = Array.from(HTMLCollection)
array.forEach(el => {});
SELECTING A SPECIFIC CHILD:
You can select the nth item in the list from both NodeLists and HTML Collections. To do so, you can use the index of the element, just like how you can select a specific item from an Array.
const listItems = document.querySelectorAll('li');
const firstItem = listItems[0];
const secondItem = listItems[1];
const thirdItem = listItems[2];
const fourthItem = listItems[3];
const fifthItem = listItems[4];
Traversing Upwards:
There are two methods to traverse upwards:
parentElement
closest
PARENTELEMENT:
parentElement is a property that lets you select the parentElement. The parentElement is the element that encloses the current element.
const firstListItem = document.querySelector('li');
const list = firstListItem.parentElement
console.log(list)
CLOSEST:
parentElement is great for selecting one level upwards. To find an element that can be multiple levels above the current element, you can use the closest method.
closest lets you select the closest ancestor element that matches a selector.
const closestAncestor = Element.closest(selector);
The selector is the same selector you pass to querySelector and querySelectorAll.
const firstLink = document.querySelector('a');
const list = firstLink.closest('.list');
console.log(list);
Note: closest starts searching from the current element, then proceeds upwards until it reaches the document. It stops and returns the first element it finds.
Traversing Sideways
There are three methods to traverse sideways:
nextElementSibling
previousElementSibling
combining parentElement, children and index.
NEXTELEMENTSIBLING:
You can select the next element with nextElementSibling
const nextElem = Node.nextElementSibling

<ul class="list">
    <li><a href="#">Link 1</a></li>
    <li><a href="#">Link 2</a></li>
    <li><a href="#">Link 3</a></li>
    <li><a href="#">Link 4</a></li>
    <li><a href="#">Link 5</a></li>
</ul>

const firstListItem = document.querySelector('li');
const secondListItem = firstListItem.nextElementSibling;
console.log(firstListItem);
Combining parentElement, Children and Index:
This method lets you select a specific sibling. It's easier to explain how it works. If you want to select "Link 4" in the HTML.
Let's say you already have the first item. To select the fourth item, you can use firstItem.parentElement to get the list, then list.children to get an HTML Collection. Once you have the HTML Collection, you can find the fourth item by using an index of 3.
const firstItem = document.querySelector('li');
const list = firstItem.parentElement;
const allItems = list.children;
const fourthItem = allItems[3];
console.log(fourthItem);
//<li><a href="#">Link 4</a></li>
Put everything in one step
const firstItem = document.querySelector('li');
const fourthItem = firstItem.parentElement.children[3];
console.log(fourthItem);
childNodes:
This property returns a NodeList of child nodes of the given element. It returns text, comments and so on. So, when you want to use it, you should be careful
let container = document.querySelector('.container');
let getContainerChilds = container.childNodes;
firstChild:
This property returns the first child of the given element.
let container = document.querySelector('.container');
let getFirstChild = container.firstChild;
nodeName:
This property returns the name of the given element. In this case, we passed a "div" it returns "div"
var container = document.querySelector('.container');
let getName = container.nodeName;
nodeValue:
This property is specific to text and comments, as it returns or sets the value of the current node. In this case, since we passed a div, it will return null.
let container = document.querySelector('.container');
let getValue - container.nodeValue;
nodeType
This property returns the type of the given element. In this case, it returns "1".
let container = document.querySelector('.container');
let getValue = container.nodeType;
But, what does "1" mean anyway. It is basically the nodeType of the given element. In this case, it is an ELEMENT_NODE_ and returns null. If this were an attribute, it would have returned "2" to us and the attribute value.
| Node Type | nodeName returns | nodeValue returns |
| 1 Element | element name | null |
| 2 Attr | attribute name | attribute value |
| 3 Text | #text | content of node |
| 4 CDATASection | #data-section | content of node |
| 5 EntityReference | entity reference name | null |
| 6 Entity | entity name | null |
| 7 ProcessingInstruction | target | content of node |
| 8 Comment | #comment | comment text |
Elements
These properties, instead of those above, return to us only elements. They are often used and recommended because they can cause less confusion.
parentNode
This property returns the parent of the node given.
let container = document.querySelector('.container');
let getParent = container.parentNode;
firstElementChild
Returns the first child element of the given element.
let container = document.querySelector('.container');
let getValue = container.firstElementChild;
lastElementChild
Returns the last child element of the given element.
var container = document.querySelector('.container');
var getValue = container.lastElementChild;
Thanks for reading!!