
Table of contents
Events
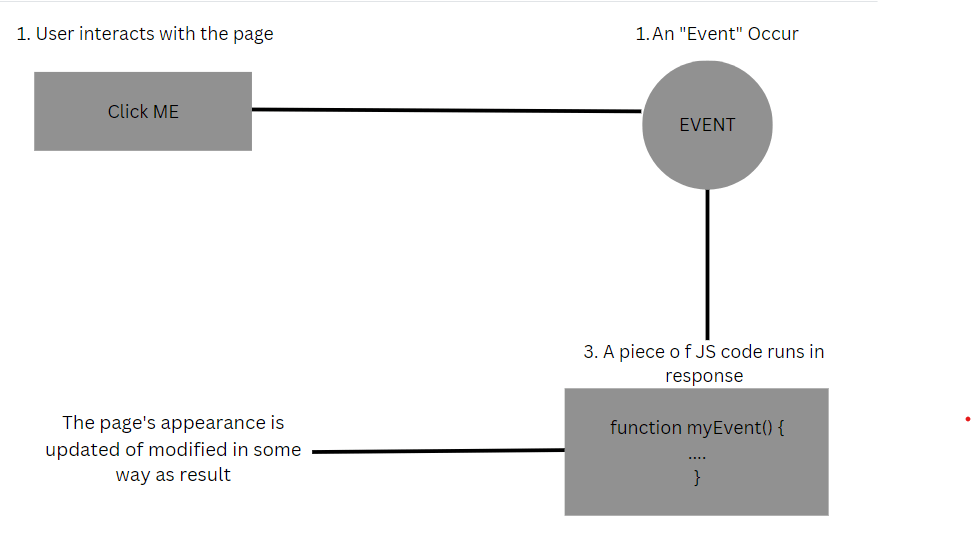
Events are signals that tell us something has happened. It can be a clicking on a button, pressing keys on the keyboard or moving the mouse over an element. With the help of JavaScript, one can respond to these events when used on web pages.
Events are actions or occurrences that happen in the system when some sort of interaction takes place on a web page. Simply put, a javascript event is something that happens when a user interacts with the web page such s clicking the button, resizing a window or ending text in text-area. In some cases, the browser itself can trigger the events, such as loading and unloading the pages.
Events and Javascript
Javascript events provide a dynamic interface to a webpage. In simple words, we can say that the interaction between JavaScript and HTML is handled entirely by events. These events occur when the user or the browser tries to make changes on the webpage. We need them as they allow us to add interactivity functionality to HTML elements by "listening" to different events that occur on the page and with the help of javascript, we can react to these events.
Events are connected to elements in the Document Object Model (DOM). And these DOM elements can be set up to accept or listen "for" these events and execute code in response to process or react to them.
There are two things we must keep in mind while working with Javascript events:
Listen to events
React to events
Listening for Events
The main thing to note is that our application is continuously flooded by events, whether or not we intended for them to be triggered. We can trigger these events manually, but in some cases, they can also be triggered automatically by the browser.
For Example: clicking a button is intentional, whereas page load happens automatically by the browser. Each event has an event handler in JavaScript, which is a block of code that will get executed when an event occurs. An event handler is also known as an event listener. It listens to the event and executes when the event occurs.
Our task is to tell the application to listen only to the events that matter to us. The recommended mechanism for listening to the right event is to use the addEventListener() method. This function is responsible for attaching an event handler to an element. It allows adding more than one handler for an event.
Syntax:
source.addEventListener(eventName, listener);
source.addEventListener(eventName, listener, useCapture);
The source is mandatory. We call an addEventListener via an HTML element or object if you wish to add your event handler. It's usually a DOM element, but it can also be our document, window or any other object built to fire events.
The eventName is mandatory. The first argument is the string that specifies the event's name we want to listen to. Some of the inbuilt events are click, load or "mousemove" etc.
The listener is mandatory. The second argument specifies the function that will get called once the event gets detected. It allows you to make changes in your web page dynamically.
The useCapture is optional and the default value is false.
false - The handler is executed in the bubbling phase.
true - The handler is executed in the capturing phase.
Note: The addEventListener() method is the recommended way to register an event listener.
Reacting to Events
To react to a JavaScript event, you need to attach an event handler. which is a block of code usually a JavaScript function that you as a programmer create that gets executed at the same time the event gets fired.
For example. while filling out a registration form, when the user clicks on the submit button, they expect certain activities such as a confirmation message if the form is submitted or not or data validation text entered is correct or not. These activities are the actions that will get executed in response to the "click" event.
When such a block of code is defined to run in response to an event, we say we are registering an event handler. Event handlers are sometimes called event listeners, and they pretty much work together. The listener listens out for the event happening, and the handler is the code that runs in response to it.
The only difference between a regular function and an event handler is that our event handler method is explicitly called out in an addEventListener call and receives an Event object as an argument.
document.addEventListener('click', changeBackground);
function changeBackground(event) {
 // code for changing the background
}
When the event that our addEventListener function cares about gets heard, any code we put within our event handler will get executed. In the above code, when the click event gets triggered or overheard by the addEventListener method, it calls the changeBackground function (i.e., the event handler) to react to this "click" event, thereby changing the backgroundColor.
Note: One HTML element can have several event handlers, even for the same event.
For Example: When a user clicks a button on a webpage, they may want to respond to this click event by displaying an alert message. We can do this using the below code:
HTML
<button id="button1">Click Me</button>
JAVASCRIPT
document.getElementById("button1").addEventListener("click", myFunction);
function myFunction() {
    alert("You clicked a button");
}
The events are categorized mainly into four groups:
mouse Events
keyboard events
form events
document/window events
Mouse Events
A Mouse Event gets triggered when the user interacts with a mouse (pointing device) on the webpage, such as clicking on an element or moving the mouse over the element. The MouseEvent interface derives from the UIEvent interface, which in turn derives from the Event interface.

The various types of mouse events are listed below:
The Click Event
The click event gets fired when a mouse is both pressed and released on a single element. Simply, we can say when the user clicks on a button on the webpage, the click event is fired. We can handle this event using an onclick event handler.
Syntax: We can handle the click event either by using the onclick event handler in HTML or Javascript and assigning a function to it or by using the addEventListener() method to attach the click event to the HTML element.
<element onclick = "myFunction">
object.onclick = function() {
    myFunction();
};
object.addEventListener("click", myFunction);
Try the following HTML code to display a dropdown menu after clicking the button in JavaScript:
<!DOCTYPE html>
<html lang="en">
<head>
    <title>The Click Event</title>
    <style>
        .box {
            width: 500px;
            height: 300px;
            margin: 10px auto;
            border: 2px solid;
            text-align: center;
            font-size: x-large;
            position: relative;
        }
        #btn1 {
            color: white;
            background-color: #008cff;
            width: 100px;
            padding: 12px;
            border: none;
            border-radius: 8px;
            cursor: pointer;
        }
        .dropdown {
            display: none;
            width: 151px;
            text-align: left;
            position: absolute;
            top: 120px;
            left: 202px;
            background-color: #f1f1f1;
            box-shadow: 3px 3px 8px grey;
        }
        .dropdown a {
            display: block;
            text-decoration: none;
            color: black;
            font-size: 16px;
            padding: 10px;
        }
        .show {
            display: block;
        }
        .dropdown a:hover {
            background-color: #adacab;
        }
        #btn1:hover {
            background-color: #0580e4;
        }
    </style>
</head>
<body>
    <div class="main">
        <div class="box" id="box1">
            <p id="message">To see the dropdown menu, click the button.</p>
            <button onclick="myFunction()" id="btn1">Click me</button>
            <div id="mydropdown" class="dropdown">
                <a href="#">Home</a>
                <a href="#">About</a>
                <a href="#">Contact</a>
            </div>
        </div>
    </div>
    <script>
        function myFunction() {
            document.getElementById("mydropdown").classList.toggle("show");
        }
    </script>
</body>
</html>
Explanation: With the help of the onclick event handler, when the user clicks on the button, a dropdown menu will get displayed on the webpage.
The Contextmenu Event
The Contextmenu event gets fired when the user attempts to open a context menu. This event is typically triggered when the user right-clicks on an element to open the context menu. We can handle this event using an oncontextmenu event handler.
Syntax: We can handle the contextmenu event either by using the oncontextmenu event handler in HTML or JavaScript and assigning a JavaScript function to it or by using JavaScript's addEventListener() method to attach the contextmenu event to the HTML element.
<element oncontextmenu = "myFunction">
object.oncontextmenu = function() {
    myFunction();
};
object.addEventListener("contextmenu", myFunction);
Try the following code to display a message when you right-click on a button
<div class= "main">
    <div class="box" id="box1">
        <p id="message"></p>
    </div>
    <button oncontextmenu="myFunction()" id="btn1">Click Me</button>
    <script>
        function myFunction() {
            let msg = document.getElementById("message");
            msg.innerHTML = "You have right-clicked a button!";
        }
    </script>
</div>
Explanation: With the help of the oncontextmenu event handler, a text that says "You are right-clicked a button!" appears on the box when you click the button.
The Mousedown Event
The mousedown event gets fired when the user passes a mouse button on an element. It differs from the click event as the click event gets fired when the mouse button is pressed and released while the pointer remains inside the same element. The mousedown event is triggered the moment the mouse button is initially pressed. It enables you to distinguish between the left, middle(scrolling wheel) and right mouse buttons. We can handle this event using an onmousedown event handler.
Syntax: We can handle the mousedown event either by using the onmousedown event handler in HTML or JavaScript and assigning a function to it or by using Javascript's addEventListener() method to attach the mousedown event to the HTML element.
<element onmousedown="myFunction">
object.onmousedown = function() {
    myFunction()
};
object.addEventListener("mousedown", myFunction);
Try the following code to display a message when you press the mouse on the button
 <div class="main">
    <div class="box" id="box1">
        <p id="message"></p>
    </div>
    <button onmousedown="myFunction()" id="btn1">Click me</button>
</div>
<script>
function myFunction() {
    let box = document.getElementById("box1");
    let msg = document.getElementById("message");
    box.style.background = 'chartreuse';
    msg.innerHTML = "The MouseDown Event is triggered as the mouse button is pressed";
}
</script>
Explanation: With the help of the onmousedown event handler, the background color of the box changes to green, and a text that says "The MouseDown Event is triggered as the mouse button is pressed" appears on the box when the mousedown event occurs.
The mouseup event
The mouseup event gets fired when the user releases the mouse button over an element. If the user clicks outside an element, drags the mouse onto it and releases the button, it is still counted as a mouseup event. This method is often used together with the mousedown() method. We can handle this event using an onmouseup event handler.
Syntax: We can handle the mouseup event either by using the onmouseup event handler in HTML or Javascript and assigning a function to it or by using Javascript's addEventListener() method to attach the mouseup event to the HTML element.
<element onmouseup = "myFunction">
object.onmouseup = function() {
    myFunction();
}
object.addEventListener("mouseup", myFunction);
Try the following code to display a message when you release the mouse over the button.
<div class="main">
    <div class="box" id="box1">
        <p id="message"></p>
    </div>
    <button onmousedown = "myFunction1()" onmouseup = "myFunction2" id="btn1">Click Me</button>
</div>
<script>
    function myFunction1() {
        let box = document.getElementById("box1");
        let msg = document.getElementById("message");
        box.style.background = 'chartreuse';
        msg.innerHTML = "The MouseDown Event is triggered as the mouse button is pressed";
    }
    function myFunction2() {
        let box = document.getElementById("box1");
        let msg = document.getElementById("message");
        box.style.background = 'yellow';
        msg.innerHTML = "The MouseUp Event is triggered as the mouse button is released";
    }
    </script>
Explanation: With the help of onmousedown and onmouseup event handler, the background color of the box changes to green, and a text that says "The MouseDown Event is triggered as the mouse button is pressed" appears on the box when the mousedown event occurs. And when the mouseup event occurs, the background color of the box changes to yellow, and another text that says, "The MouseUp Event is triggered as the mouse button is released" appears on the box.
Note: The mouseup events are the counterpoint to mousedown events.
The Mouseenter Event
The mouseenter event gets fired when the user moves the mouse button inside or the mouse enters the element. It is used to create nice effects with images and text as well. We can handle this event using an onmouseenter event handler.
Syntax: We can handle the mouseenter event either by using the onmouseenter event handler in HTML or JavaScript and assigning a function to it or by using the addEventListener() method to attach the mouseenter event to the HTML element.
<element onmouseenter="myFunction">
object.onmouseenter = function() {
    myFunction()
};
object.addEventListener("mouseenter", myFunction);
Try the following code to display a message and keep a count of how many times the mouse enters the box
<!DOCTYPE html>
<html lang="en">
<head>
    <title>The Mouseenter Event</title>
    <style>
        .main {
            width: 100%;
        }
        .box {
            width: 200px;
            height: 200px;
            border: 2px solid;
            text-align: center;
            font-size: larger;
            margin: 10px auto;
        }
    </style>
</head>
<body>
    <div class="main">
        <div class="box" id="box1" onmouseenter="myFunction()">
            <p id="message"></p>
            <p>Mouseenter event triggered:
                <span id="span_message">0</span>
                times
            </p>
            <p>The Mouseenter event gets fired every time the mouse enters the box.</p>
        </div>
    </div>

    <script>
        function myFunction() {
            var box = document.getElementById("box1");
            box.style.width = '500px';
            box.style.height = '300px';
            box.style.background = 'chartreuse';
            document.getElementById("message").innerHTML = "The Mouseenter Event is triggered.";
            document.getElementById("span_message").innerHTML++;
        }
    </script>
</body>
</html>
Explanation: With the help of the onmouseenter event handler, the background color of the box changes to green, box sizes up and a text that says "The Mouseenter Event is triggered" appears on the box when the mouseenter event occurs.
The Mouseleave Event
The mouseleave event gets fired when the mouse button moves outside or leaves the element. This method is often used together with the mouseenter() method. And both mouseenter and mouseleave events donot bubble and do not get fired when the mouse cursor enters or leaves its child elements. We can handle this event using an onmouseleave event handler.
Syntax: We can handle the mouseleave event either by using the onmouseleave event handler in HTML or JavaScript and assigning a function to it or by using JavaScript's addEventListener() method to attach the mouseleave event to the HTML element.
<element onmouseleave = "myFunction">
object.onmouseleave = function() {
    myFunction()
};
object.addEventListener("mouseleave", myFunction);
Try the following code to display a message and keep a count of how many times the mouse leaves the box.
    <div class="main">
        <div class="box" id="box1" onmouseleave="myFunction()">
            <p id="message"></p>
            <p>Mouseleave event triggered:
                <span id="span_message">0</span>
                times
            </p>
            <p>The Mouseleave event gets fired every time the mouse button moves outside the box.</p>
        </div>
    </div>

    <script>
        function myFunction() {
            var box = document.getElementById("box1");
            box.style.background = 'linear-gradient(45deg, red, blue)';
            box.style.color = 'white';
            document.getElementById("message").innerHTML = "The Mouseleave Event is triggered.";
            document.getElementById("span_message").innerHTML++;
        }
    </script>
Explanation: With the help of the onmouseleave event handler, the background color of the box changes, a text that says "The Mouseleave Event is triggered" appears on the box and another text displaying the number of times the mouseleave event occurs gets displayed.
The Mouseover Event
The Mouseover event gets fired when the user moves the mouse button inside the element or one of its children. It is similar to the mouseenter event, but the mouseover event differs as it gets triggered every time the mouse enters the div element or its child elements. On the other hand, the mouseenter event gets triggered only when the mouse enters the div element. We can handle this event using an onmouseover event handler.
Syntax:
We can handle the mouseover event either by using the onmouseover event handler in HTML or JavaScript and assigning a function to it or by adding the addEventListener() method to attach the mouseover event to the HTML element.
<element onmouseover = "myFunction">
object.onmouseover = function() {
    myFunction()
};
object.addEventListener("mouseover", myFunction);
Try the following code to display a message and keep a count of how many times the mouse enters the box or its child elements
   <div class="main">
        <div class="box" id="box1" onmouseover="myFunction()">
            <p id="message"></p>
            <p>Mouseover event triggered:
                <span id="span_message">0</span>
                times
            </p>
            <p>The Mouseover event gets fired every time the mouse enters the box or its child elements (here < p >).</p>
        </div>
    </div>

    <script>
        function myFunction() {
            var box = document.getElementById("box1");
            box.style.background = 'linear-gradient(45deg, red, blue)';
            box.style.color = 'white';
            document.getElementById("message").innerHTML = "The Mouseover Event is triggered.";
            document.getElementById("span_message").innerHTML++;
        }
    </script>
Explanation: With the help of the onmouseover event handler, the background color of the box changes, a text that says "The Mouseover Event is triggered" appears on the box and another text displaying the number of times the mouseover event occurs gets displayed.
The Mouseout Event
The mouseout event gets fired when the user moves the user moves the mouse button outside the element or one of its children. It is always confused with the mouseleave event, but they both differ. In the case of the mouseleave event, if the parent element (the element to which the event is attached) has any descendants or child elements, this event gets fired only when the mouse leaves the parent element and not the child elements. On the other hand, the mouseout event gets triggered every time the mouse leaves the parent element as well as its child elements. We can handler this event using an onmouseout event handler.
Syntax:
We can handle the mouseout event either by using the onmoueout event handler in HTML or JavaScript and assigning a function to it or by using addEventListener() method to attach the mouseout event to the HTML element.
<element onmouseout = "myFunction">
object.onmouseout = function() {
    myFunction()
};
object.addEventListener("mouseout", myFunction);
Try the following code to display a message and keep a count of how many times the mouse leaves the box or its child elements.
    <div class="main">
        <div class="box" id="box1" onmouseout="myFunction()">
            <p id="message"></p>
            <p>Mouseout event triggered:
                <span id="span_message">0</span>
                times
            </p>
            <p>The Mouseout event gets fired every time the mouse button moves outside the box or its child elements (here < p >).</p>
        </div>
    </div>

    <script>
        function myFunction() {
            var box = document.getElementById("box1");
            box.style.background = 'linear-gradient(45deg, red, blue)';
            box.style.color = 'white';
            document.getElementById("message").innerHTML = "The Mouseout Event is triggered.";
            document.getElementById("span_message").innerHTML++;
        }
    </script>
Explanation: With the help of the onmouseout event handler, the background color of the box changes, a text that says "The Mouseout Event is triggered" appears on the box, and another text displaying the number of times the mouseout event occurs gets displayed.
The Mousemove Event
The mouseout event gets fired when the user moves the mouse button or hovers over an element. We can handle this event using an onmousemove event handler.
Syntax:
We can handle the mousemove event either by using the onmousemove event handler in HTML or Javascript and assigning a JavaScript function to it or by using JavaScript's addEventListener() method to attach the mousemove event to the HTML element.
<element onmousemove="myFunction">
object.onmousemove = function(){myFunction()};
object.addEventListener("mousemove", myFunction);
Try the following code to display the horizontal and vertical coordinates of your mouse pointer, and keep a count of how many times the mouse moves over the box.
    <div class="main">
        <div class="box" id="box1" onmousemove="myFunction(event)">
            <p id="message"></p>
            <p>Mousemove event triggered:
                <span id="span_message">0</span>
                times
            </p>
            <p id="message1"></p>
        </div>
    </div>

    <script>
        function myFunction(e) {
            var box = document.getElementById("box1");
            box.style.background = 'linear-gradient(45deg, red, blue)';
            box.style.color = 'white';
            document.getElementById("message").innerHTML = "The Mousemove Event is triggered.";
            document.getElementById("span_message").innerHTML++;
            var x = e.clientX;
            var y = e.clientY;
            var coor = "Coordinates: (" + x + "," + y + ")";
            document.getElementById("message1").innerHTML = coor;
        }
    </script>
Explanation: With the help of the onmousemove event handler, the background color of the box changes, a text that says the total number of times the mousemove event occurs appears on the box, and another text stating the coordinates of the mouse pointer gets displayed.
Keyboard Events
A Keyboard Event gets triggered when the user interacts with any keys on the keyboard on the webpage. The KeyboardEvent interface also derives from the UIEvent interface, which in turn derives from the Event interface. The common events that belong to the KeyboardEvent are:
The KeyDown Event
The keydown event gets fired when the user presses any key (on the keyboard). We can handle this event using an onkeydown event handler.
Syntax:
We can handle the keydown event either by using the onkeydown event handler in HTML or Javascript and assigning a JavaScript function to it or by using JavaScript's addEventListener() method to attach the keydown event to the HTML element.
<element onkeydown="myFunction">
object.onkeydown = function(){myFunction()};
object.addEventListener("keydown", myFunction);
Try the following code to display a message when you press a key.
    <div class="main">
        <div class="box" id="box1">
            <p id="message"></p>
            <p>Press any key inside the input field</p>
            <input type="text" onkeydown="myFunction()">
        </div>
    </div>

    <script>
        var count=0;
        function myFunction() {
            count++;
            var box = document.getElementById("box1");
            box.style.background = 'linear-gradient(45deg, red, blue)';
            box.style.color = 'white';
            document.getElementById("message").innerHTML = "The KeyDown Event is triggered " + count+" times.";
        }
    </script>
Explanation: With the help of the onkeydown event handler, the background color of the box changes, and a text stating the total number of times the keydown event occurs appears on the box when you press a key on the input field.
The KeyUp Event
The keyup event gets fired when the user releases a key (on the keyboard). When you press any key on the keyboard, the keydown event gets triggered first, and if you hold down the key, the keydown event gets triggered multiple times. Only when you release the key, does the keyup event gets fired. We can handle this event using an onkeyup event handler.
Syntax:
We can handle the keyup event either by using the onkeyup event handler in HTML or Javascript and assigning a JavaScript function to it or by using JavaScript's addEventListener() method to attach the keyup event to the HTML element.
<element onkeyup="myFunction">
object.onkeyup = function(){myFunction()};
object.addEventListener("keyup", myFunction);
Try the following code to display a message and convert the key to uppercase (if the key entered is a character) as soon as you release the key.
    <div class="main">
        <div class="box" id="box1">
            <p id="message"></p>
            <p>Press any key inside the input field</p>
            <input type="text" id="input-field" onkeyup="myFunction()">
        </div>
    </div>

    <script>
        var count=0;
        function myFunction() {
            count++;
            var box = document.getElementById("box1");
            var input = document.getElementById("input-field");
            box.style.background = 'linear-gradient(45deg, red, blue)';
            box.style.color = 'white';
            document.getElementById("message").innerHTML = "The KeyUp Event is triggered "+count+" times.";
            input.value = input.value.toUpperCase();
        }
    </script>
Explanation: With the help of the onkeyup event handler, the background color of the box changes, and a text stating the total number of times the keyup event occurs appears on the box. In addition, if the key entered in the input field is a character, it is converted to upper case as soon as the key is released.
The KeyPress Event
The event gets fired when a key that produces a character value is pressed down (i.e., alphabetic, numeric, and punctuation keys). It is no longer recommended to use this event as it has been deprecated.
Form events
A javascript Form event gets triggered when a user interacts with a form on a website. Form events are used to make the form-filling process more interactive and informative for the user. These forms of events include:
The Focus Event
The focus event gets fired once the element has received focus. The most common job is to change the background color of the HTML element on focus. It clearly distinguishes it from the others and makes it stand out that this element is the one that is presently on focus.

It belongs to the FocusEvent interface, which inherits all the properties and methods from the UIEvent interface, which in turn derives from the Event interface. We can handle this event using an onfocus event handler.
Syntax:
We can handle the focus event either by using the onfocus event handler in HTML or Javascript and assigning a JavaScript function to it or by using JavaScript's addEventListener() method to attach the focus event to the HTML element.
<element **onfocus**="myFunction">
object.**onfocus** = function(){myFunction()};
object.addEventListener("**focus**", myFunction);
Try the following code to make changes in the box once the input field has gained focus.
    <div class="main">
        <div class="box" id="box1">
            <p id="message"></p>
            <p>Enter name inside the input field</p>
            <input type="text" id="input-field" placeholder=" Enter your name">
        </div>
    </div>

    <script>
        var input = document.getElementById("input-field");
        input.onfocus = function () { myFunction() };
        function myFunction() {
            var box = document.getElementById("box1");
            box.style.background = 'linear-gradient(45deg, pink, purple)';
            box.style.color = 'white';
            document.getElementById("message").innerHTML = "The Focus Event is triggered.";
            input.style.height = '30px';
            input.style.borderRadius = '5px';

        }
    </script>
After the execution of the above code, the output will look like:
Explanation: With the help of the onfocus event handler, the background color of the box changes, a few changes in input field is made, and a text that says "The FocusEvent is triggered" appears on the box.
The Blur Event
The blur event gets fired once the element loses its focus. It belongs to the FocusEvent interface, which inherits all the properties and methods from the UIEvent interface, which in turn derives from the Event interface. We can handle this event using an onblur event handler.
Syntax:
<element onblur="myFunction">
object.onblur = function(){myFunction()};
object.addEventListener("blur", myFunction);
Try the following code to remove the changes made inside the input field once it loses its focus, using addEventListener.
    <div class="main">
        <div class="box" id="box1">
            <p id="message"></p>
            <p id="message1">Enter name inside the input field</p>
            <input type="text" id="input-field" placeholder=" Enter your name">
        </div>
    </div>

    <script>
        var input = document.getElementById("input-field");
        input.addEventListener("blur", myFunction);

        function myFunction() {
            document.getElementById("message").innerHTML = "The Blur Event is triggered.";
            document.getElementById("message1").innerHTML = "The name will not be displayed since the input field has lost its focus.";
            input.value = "";
        }
    </script>
After the execution of the above code, the output will look like:
Explanation: With the help of the onblur event handler, a text that says "The BlurEvent is triggered" appears on the box, and changes made inside the input field are removed as soon as the input field loses its focus.
The Submit Event
The submit event gets fired when the user submits a form. It is used to validate the data entered before the user submits the request to the server-side. It belongs to the SubmitEvent interface, which inherits all the properties and methods from the Event interface. We can handle this event using an onsubmit event handler.
Syntax:
We can handle the submit event either by using the onsubmit event handler in HTML or Javascript and assigning a JavaScript function to it or by using JavaScript's addEventListener() method to attach the submit event to the HTML element.
<element onsubmit="myFunction">
object.onsubmit = function(){myFunction()};
object.addEventListener("submit", myFunction);
Try the following code to display an alert message once the form is submitted.
   <div class="main">
        <div class="box" id="box1">
            <p>Enter text inside the input field</p>
            <form id="formID" action="#">
                <input type="text" id="input-field" placeholder=" Ex : Enter your name">
                <br>
                <button type="submit" id="btn1">Submit</button>
            </form>
        </div>
    </div>

    <script>
        document.getElementById("formID").onsubmit = function () { myFunction() };
        function myFunction() {
            alert("You have submitted the form.");
            document.getElementById("input-field").value="";
        }
    </script>
After the execution of the above code, the output will look like:
Explanation: When you submit the form, with the help of an onsubmit event handler, an alert message gets displayed on the webpage.
The Change Event
The change event gets fired when the user changes the value of an HTML element (i.e., <input >, <select >, and <textarea >) on the webpage. It belongs to the Event interface. We can handle this event using an onchange event handler.
Syntax:
We can handle the change event either by using the onchange event handler in HTML or Javascript and assigning a JavaScript function to it or by using JavaScript's addEventListener() method to attach the change event to the HTML element.
<element onchange="myFunction">
object.onchange = function(){myFunction()};
object.addEventListener("change", myFunction);
Try the following code to change the background color of the box (based on your input).
    <div class="main">
        <div class="box" id="box1">
            <p>Choose your favorite color</p>
            <select id="colors" name="colors">
                <option value="">Select One </option>
                <option value="red">Red</option>
                <option value="blue">Blue</option>
                <option value="yellow">Yellow</option>
                <option value="black">Black</option>
                <option value="orange">Orange</option>
                <option value="purple">Purple</option>
                <option value="chartreuse">Chartreuse</option>
                <option value="pink">Pink</option>
            </select>
            <p id="message"></p>
        </div>
    </div>
    <script>
        var input = document.getElementById("colors");
        input.addEventListener("change", myFunction);

        function myFunction() {
            var value = input.value;
            document.getElementById("message").innerHTML = "The Change Event is triggered.";
            var colorvalue = 'linear-gradient(45deg, grey, ' + value + ')';
            document.getElementById("box1").style.background = colorvalue;
        }
    </script>
After the execution of the above code, the output will look like:
Explanation: The background color of the box changes based on your input, and a text that says "The Change Event is triggered" appears on the box.
Window/Document Events
A Window event gets triggered when the user does something that affects an entire browser window. For example, when the webpage loads or when the user resizes the browser window. These window events include:
The Load Event
The load event gets fired when the whole page has loaded, including all dependent resources such as stylesheets and images. It can also be used to deal with cookies. It belongs to the Event interface and we can handle this event using an onload event handler.
Syntax:
We can handle the load event either by using the onload event handler in HTML or Javascript and assigning a JavaScript function to it or by using JavaScript's addEventListener() method to attach the load event to the HTML element.
<element onload="myFunction">
object.onload = function(){myFunction()};
object.addEventListener("load", myFunction);
Try the following code to check if cookies are enabled or not once the web page completely loads all the content.
<body onload="checkCookies()">
    <div class="main">
        <div class="box">
            <p id="message"></p>
        </div>
    </div>

    <script>
        function checkCookies() {
            var text = "";
            if (navigator.cookieEnabled == true) {
                text = "Cookies are enabled.";
            } else {
                text = "Cookies are not enabled.";
            }
            document.getElementById("message").innerHTML = text;
        }
    </script>
</body>
After the execution of the above code, the output will look like:
The Unload Event
The unload event gets fired when the document or a child resource is being unloaded. Typically, the unload event gets fired when the user navigates from one page to another, clicks on a link to leave the page, or types a new URL in the address bar. This event is used to send the analytic data or to clean up resources. It belongs to the Event interface, and we can handle this event using an onunload event handler. However, using the addEventListener() method to register the unload event handler is a good practice. In most browsers, the unload event isn't correctly supported.
Warning: Developers should avoid using this event because it is not reliably fired, especially on mobile devices. Also, it is not bfcache-compatible (back/forward cache). Browsers like Chrome, will not fire the unload when a user navigates away.
The Resize Event
The resize event gets fired when the user resizes the document view (window). Earlier in some browsers, it was possible to register resize event handlers on any HTML element. It is still possible to set onresize attributes or use addEventListener() to set a handler on any element. However, resize events are only fired on the window object. Simply put, the resize event is only triggered when the browser window's size changes.
It belongs to the UIEvent interface, and we can handle this event using an onresize event handler. To get the size of the window, we can use the JavaScript's window.outerWidth and window.outerHeight events.
Syntax:
We can handle the resize event either by using the onresize event handler in HTML or Javascript and assigning a JavaScript function to it or by using JavaScript's addEventListener() method to attach the resize event to the HTML element.
<element onresize="myFunction">
object.onresize = function(){myFunction()};
object.addEventListener("resize", myFunction);
Try the following code to display the width and height of the window once you resize it.
    <div class="main">
        <div class="box">
            <p>Resize the browser window to display the  width and height of the window.</p>
            <p>Window's width : <span id="width"></span></p>
            <p>Window's height :<span id="height"></span></p>
        </div>
    </div>

    <script>
        function myFuction() {
            var window_width = window.outerWidth;
            var window_height = window.outerHeight;
            document.getElementById("width").innerHTML = window_width;
            document.getElementById("height").innerHTML = window_height;
        }
    </script>
After the execution of the above code, the output will look like this:
HTML 5 Standard Events
The standard HTML 5 events are listed here for your reference.
| Attribute | Description |
| onafterprint | Triggers after the associated document is printed. |
| onbeforeprint | Triggers before the associated document is printed. |
| onbeforeunload | Triggers when a window is about to unload its resources. |
| onabort | Triggers when a user aborts the loading of an element. |
| onoffline | Triggers when the browser starts to work offline. |
| ononline | Triggers when the browser starts to work online. |
| onload | Triggers when the document finishes loading. |
| onunload | Triggers when the user navigates away from the page. |
| onblur | Triggers when an element loses its focus. |
| onfocus | Triggers when an element gains its focus. |
| oncanplay | Triggers when the user can play the media but may have to stop due to buffering. |
| oncanplaythrough | Triggers when the user can play the media to the end but won't stop due to buffering. |
| onchange | Triggers when the value of an element changes. |
| onclick | Triggers when the user clicks the left mouse button on the element. |
| oncontextmenu | Triggers when the user clicks the right mouse button on the element. |
| ondblclick | Triggers when the user double-clicks on the element. |
| ondrag | Triggers when the user drags an element. |
| ondragend | Triggers when the user releases the mouse button at the end of a drag operation. |
| ondragenter | Triggers when a draggable element enters a valid drop target. |
| ondragleave | Triggers when a draggable element leaves a valid drop target. |
| ondragover | Triggers when a draggable element is being dragged over a valid drop target. |
| ondragstart | Triggers when the user starts to drag an element. |
| ondrop | Triggers when a draggable element is dropped on a valid drop target. |
| ondurationchange | Triggers when the duration of the audio/video is changed. |
| onemptied | Triggers when a media resource element is empty. |
| onended | Triggers when the audio/video has reached the end. |
| onerror | Triggers when an error occurs. |
| onmousedown | Triggers when a user presses a mouse button over an element. |
| onmouseup | Triggers when a user releases a mouse button over an element. |
| onmouseout | Triggers when the mouse pointer is moved out of an element, or one of its children. |
| onmouseover | Triggers when the mouse pointer is moved onto an element, or one of its children. |
| onmousemove | Triggers when the user moves the mouse pointer over an element. |
| onkeydown | Triggers when the user presses a key. |
| onkeypress | Triggers when the user presses an alphanumeric key. |
| onkeyup | Triggers when the user releases a key. |
| onsearch | Triggers when the user writes something in a search input field. |
| onsubmit | Triggers when a user submits the form. |
| oninput | Triggers when an element receives user input. |
| oninvalid | Triggers when an submittable element is invalid. |
| onpagehide | Triggers when a user is navigating away from a webpage. |
| onpageshow | Triggers when a user navigates to a webpage. |
| onpopstate | Triggers when changes are made in window's history. |
| onresize | Triggers when the browser window is resized. |
| onstorage | Triggers when a storage area has been changed. |
| onscroll | Triggers when an element's scrollbar is being scrolled. |
| onselect | Triggers when an element is selected. |
| onplay | Triggers when the audio/video has been started or is no longer paused. |
| onplaying | Triggers when playback is ready to start after being paused or delayed. |
| onpause | Triggers when the playback is paused, either by the user or programmatically. |
| onprogress | Triggers when the browser is downloading the specified audio/video. |
| onstalled | Triggers when the user is trying to fetch media data. |
| onsuspend | Triggers when the loading of the media is intentionally stopped. |
| ontimeupdate | Triggers when the playing position of an audio/video has changed. |
| onvolumechange | Triggers when the volume of a video/audio has been changed. |
| onwaiting | Triggers when the video stops because it needs to buffer the next frame. |
Removing an Event Listener
If you've added an event handler using addEventListener(), you can remove it again using the removeEventListener() method.
Syntax:
The removeEventListener() method is called via an HTML element or object you want to remove your event handler. It takes eventname (i.e., a string which specifies the name of the event to remove), istener (i.e., the function to remove), and useCapture(i.e., optional) as parameters.
source.removeEventListener(eventName, listener); source.removeEventListener(eventName, listener, useCapture);
The arguments used in removeEventListener() are exactly the same ones that are used in addEventListener() function. It happens so as the javaScript uses the eventName, listener, and the true/false value to uniquely identify that event listener. To remove this event listener, we need to specify the exact arguments.
For Example: This would remove the myFunction() event handler:
button1.removeEventListener("click",myFunction);
Here is another Example:
document.addEventListener("click", myFunction);
document.removeEventListener("click", myFunction);

function myFunction() {
    alert("Hello World!")
}
The event listener we added first gets cancelled out by the removeEventListener call in the next line.
Note: Calling removeEventListener() with arguments that do not identify any currently registered EventListener on the source has no effect.
Event Handlers
When an event, consider pressing a keyboard key or clicking an element, occurs on a DOM or an HTML element, we can call the specific functions based on these events. Now, how does the HTML element know when to call the mentioned JavaScript function or code? This is taken care of by the event handlers. The properties of DOM or HTML elements are called event handlers to control how an element should respond to a given event.
When a user clicks a specific mouse button or types a specific keyword into the browser, that action activates the corresponding event handler for that HTML element. The browser then shows the end users the effects of the actions that were carried out on the web page by the Javascript code that was executed by the event handler.
Registering Event Handlers in JavaScript
For registering handlers, there are two recommended methods. By assigning the event handler code to the target element's corresponding onevent property or by adding the handler as a listener for the element using the addEventListener() method, the event handler code can be made to execute when an event is triggered. The main difference is that using the event listener methods, additional event handlers can be added or removed.
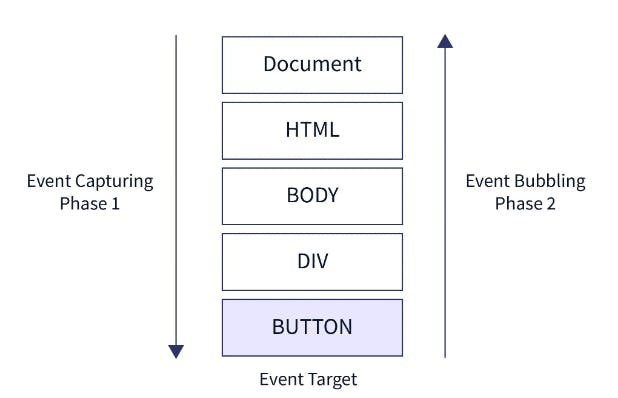
Different Phases of Event Handling in JavaScript
The lifecycle of a JavaScript event contains three different phases of events:
Capturing Phase
In the capture phase, generally known as the trickling phase, the event "trickles down" to the element that caused the event.
Target Phase
It starts with the element and handler at the top level and works its way down to the element. When the event arrives at the target, the capture phase is over.
Bubbling Phase
The event is "bubbled" up to the DOM tree during the bubble phase. The innermost handler initially captures and handles it (the one that is closest to the element on which the event occurred). After that, it moves up (or bubbles up) to the DOM tree's higher levels, moves up to its parents and eventually returns to the root.
In event handling in Javascript, when an event reaches the element, it enters the capturing phase. Events enter the target phase when they reach the element, and they up from the element during the bubbling phase.
HTML Event Handler Attributes
The names of event handlers typically start with on; for example, onclick is the name of the event handler for the click event. Use an HTML attribute with the name of the event handler to assign an event handler to an event connected to an HTML element.
<input type="button" value="save" onclick="alert('The button is clicked');
The HTML characters like the ampersand(&), double quotes(") and other special characters must be escaped when using Javascript code as the value of the onclick attribute. A function defined in a script must be called by an event handler in HTML
<script>
    function myAlert() {
        alert('The button is clicked');
    }
</script>
<input type="button" value="save" onclick="myAlert()">
When a button is clicked in this example, the myAlert() function is called. A separate <script> element defined the function "myAlert()" which could be included in a separate JavaScript file. When using event handlers as attributes of an HTML element, the following are some important aspects:
First, without explicitly defining the event, the event object can be accessed by the code in the event handler:
<input type="button" value="save" onclick="alert(event.type)">
Second, the events' target element is represented by this value inside the event handler.
<input type="button" value="save" onclick="alert(this.value)">
Third, the element's properties can be accessed by the event handler.
<input type="button" value="save" onclick="alert(value)">
Disadvantages of using HTML Event Handler attributes in JavaScript
Due to the below reasons, assigning event handlers using HTML event handler attributes is not regarded as a good practice and should be avoided as much as possible in event handling in JavaScript:
The event handler code is first mixed in with the HTML code, making it more difficult to extend and maintain.
Timing issue: Users may start interacting with the element on the webpage, which will result in an error if the element fully loads before the Javascript code.
Consider the following myAlert() function, which is defined in a separate JavaScript file:
<input type="button" value="save" onclick="myAlert()">Besides this, the myAlert() function returns an unknown value when the page has fully loaded but JavaScript has not. Users will experience an error if they press the button at this time.
Event Objects
Event handler functions accept an argument, the event object, even though we haven't used it up to this point. Additional information about the event is also included in this object.
<button>Click Me!</button>
<script>
    let btn = document.querySelector("button");
    btn.addEventListener("mousedown", event => {
        if (event.btn == 0 ) {
            console.log("Left mouse button was pressed");
        } else if (event.btn == 1) {
            console.log("Middle mouse button was pressed");
        } else if (event.btn == 2) {
            console.log("Right mouse button was pressed");
        }
});
</script>
Types of Event Handlers
JavaScript offers a variety of event handlers that are activated in response to specific actions taken on the HTML elements. A few of the event handlers in event handling in Javascript are:
| Event Handler | Description |
| onclick | When a click action occurs on an HTML element, this event handler runs a JavaScript script. For example, the onClick event handler may be called when a button is clicked, a link is clicked, a checkbox is checked, or an image map is selected. |
| onmouseover | When the mouse is over a particular link or object, this event handler runs a JavaScript script. |
| onload | When a window or image has fully loaded, this event handler executes some JavaScript code. |
| onkeypress | When a user presses a key, this event handler executes JavaScript code. |
| onmouseout | When the mouse leaves a specific link or object, this event handler runs a JavaScript script. |
| onkeyup | When a key is released during a keyboard action, this event handler executes JavaScript code. |
| onkeydown | When a key is pressed on the keyboard during an action, this event handler runs a JavaScript script. |
Propagation
For the majority of event types, the handlers registered on nodes with the children-level events. If the button within a paragraph is clicked, the paragraph's event handlers can also see that click event. If both the button and the paragraph have a handler, the handler on the button which is more specific will execute first.
The event is said to propagate outward, from the node where it occurred to the parent node of that node and then to the document's root. After every handler registered on the particular node has had their chance to respond to the event, the handlers that registered on the entire window are given the chance to do so.
A handler for an event can invoke the stopPropagation() method on the event object at any time to prevent successive handlers from getting the event. This may be useful in event handling in Javascript if for example we have a button inside another clickable element and we do not want button clicks to activate the outer click behaviour of an element.
Default Actions
For the majority of event types, the Javascript event handlers are called before the default behaviour. If the handler does not want this normal behaviour to occur, typically because it has already handled the event, it can call the event object's preventDefault() method.
This allows you to implement custom keyboard shortcuts and context menus. It may also be used to interfere obnoxiously with the expected behavior of users.
<a href="www.google.com">What is event handler</a>
<script>
    let web = document.querySelector("a");
    web.addEventListener("click", event => {
        console.log("Not possible");
        event.preventDefault();
    });
</script>
Key Events in Javascript
The key events occur each time a user interacts with the keyboard. There are three main key event types in event handling in Javascript that involves keyup, keydown and keypress.
Despite its name, "keydown" is not only triggered when a key is physically pushed. When a key is pushed and held, the event is triggered each time the key is repeated. Or sometimes, you must take extra care in this case. For instance, we add a button to the Document Object Model when a key is pushed and delete it when the key is released. Now, if the key is held down longer you may accidentally add hundreds of buttons.
| Event | Description |
| Onkeydown | This event is triggered when the user is pressing a key. |
| Onkeypress | This event is triggered when the user presses the key. |
| Onkeyup | This event is triggered when the user releases the key. |
Pointer Events
Pointer events are the Document Object Model events that are triggered for a pointing device. There are some common methods for pointing at objects on a screen such as mouse, trackballs, touchpads, pens and touchscreens. The pointer is a device that is hardware-independent and can target a specific set of screen coordinates.
Mouse clicks
When any mouse button is pressed, a number of events are triggered. Similar to the "keydown" and "keyup", the "mouseup" and "mousedown" events are also fired when the mouse button is pushed and released. And, these occur on the DOM nodes directly under the mouse pointer at the time that event happens.
After the event, "mouseup", the click event is fired on the most specified node which contains both the button press and release. For example, If we hold down the mouse button on one paragraph and move the pointer to another paragraph, then release the button, the event "click" will occur on the element containing both paragraphs.
Event Delegation
Event Delegation is a pattern based upon the concept of Event Bubbling. It is an evet-handling pattern that allows you to handle events at a higher level in the DOM tree other than the level where the element was first received.
By default, events triggered to an element propogate up to the DOM tree to the element's parent, its ancestors, and on up until the root element
<div>
    <span>
        <button>Click Me!</button>
    </span>
</div>
Here we have a div which is a parent of a span which in turn is a parent of the button element. Due to event bubbling, when the button receives an event, say click, that event bubbles up the tree, so span and div will respectively receive the vent as well.
How does Event Delegation work
With Event Delegation, instead of handling the click event on the button, you can handle it on the div. The idea is that you "delegate" the handling of an event to a different element instead of the actual element that received the event.
const div = document.getElementsByTagName("div")[0];
div.addEventListener("click", (event) => {
if (event.target.tagName === "BUTTON") {
    console.log("Button was clicked");
}
})
The event object has a target property which contains information about the element that received the event. On target.tagName, we get the name of the tag for the element, and we check if it's BUTTON.
With this code, when you click the button, the event bubble up to the div which handles the event.
Benefits of Event Delegation
Event Delegation is a useful pattern that allows you to write cleaner code, and create fewer event listeners with similar logic
<div>
    <button> Button 1 </button>
    <button> Button 2 </button>
    <button> Button 3 </button>
</div>
Here we have 3 buttons. Let's say we wanted to handle a click event on each button, such that when it is clicked, the button's text is logged to the console. We can implement that like this:
const button = document.querySelectorAll('button');
buttons.forEach(button => {
button.addEventListener("click", (event) => {
console.log(event.target.innerText)
})
})
I am using querySelectorAll here as it returns a NodeList which I can use the forEach method for. getElementsByTagName returns an HTMLCollection which doesn't have the forEach method.
When you click on the first button, you have "Button1" logged on the console. For the second button, button2 is logged, and for the third button, "Button3" is logged.
Although this works, we have created 3 event listeners for the three buttons.
Since the click event on these buttons propogates upward in the DOM tree, we can use a common parent or ancestor that they have to handle the event. In this case, we delegate a common parent that they share to handle the logic we want.
const div = document.querySelector('div');
div.addEventListener("click", (event) => {
    console.log(event.target.innerText);
}
})
Now, we just have one event listener, but the same logic: when you click the first button, "Button 1" is logged to the console and the same thing for the other buttons
Now, even if we add an extra button like this:
<div>
    <button> Button 1 </button>
    <button> Button 2 </button>
    <button> Button 3 </button>
    <button> Button 4 </button>
</div>
We won't have to change the JavaScript code as this new button also shares the div parent (which we delegated for the event handling) with the other buttons.
Thanks for reading the article!!