Object Oriented Programming in JavaScript


Table of contents
- Introduction
- Introduction to JavaScript Classes
- Creating JavaScript Class
- JavaScript Class Methods
- Using a JavaScript Class
- The Constructor Method
- Extending a Class
- Class Fields
- Instance Fields
- Static Fields
- Getters and Setters Method
- Hoisting
- 'use strict'
- Computed Names [...]
- Making Bound Methods with Class Fields
- No Arrow Function
- The arrow function has no Prototype Property
- Arrow Function has no New Operator
- Class Features Availability
- Class vs Custom type
- Creating user-defined object
- Advantages of Creating a Prototype First
- Defining the Prototype
- What is [[Prototype]]
- New with Classes
- Why do we need Constructors?
- Introduction to Inheritance in JavaScript
- Encapsulation in JavaScript
- Static Methods in JavaScript
- Relationship between Static Method and Class
- Relationship between Static method and Object
- Static Methods and this
- Accessing Static Members from another Static method
- Accessing Static Members From A Class Constructor and Non-static methods
- Accessing Static members from a Class Constructor
- Accessing Static Members from Non-Static methods
- Memory Allocation of Static method
- Why do we need a Static method
- Difference between Static and Non-Static methods in JavaScript
- Points To Remember About Static Methods In JavaScript
- Static Properties
- Accessing Static Property
- Inheritance of Static Methods and Properties
- Getter and Setter in JavaScript
Introduction
A Class is a blueprint used to create objects in JavaScript. Classes in JavaScript can be defined as a template that encapsulates the data with code to work on that data. The classes in JavaScript are provided in the ES6 addition to extend object properties and methods more elegantly.
Introduction to JavaScript Classes
JavaScript is a prototype-based language. Every element in JavaScript has a hidden internal property called [[Prototype]] that can be used to extend object properties and methods. Earlier in JavaScript, the classes were implemented in a prototypical manner with the use of functions.
In language specification ES6, the concept of classes in JavaScript was introduced to provide a cleaner syntax to write blueprints from which objects can be extended.
JavaScript Class Syntax:
class ClassName {
    constructor() {...}
}
Explanation of the Syntax:
The class keyword is used to create a class in JavaScript.
The class name is the name of the class. It is user-defined.
The constructor() is a method used to initialize the object properties. It is executed automatically when a new object of the given class is created. (It may take parameters).
Creating JavaScript Class
Let's create a class for students studying in a class. This class will consist of the student's first name, last name, age and roll no.
class Student {
    constructor(firstName, lastName, age, rollNo) {
        this.firstName = firstName;
        this.lastName = lastName;
        this.age = age;
        this.rollNo = rollNo;
    }
}
The "this" keyword in JavaScript is used to refer to the current object in a method or constructor. It is used to stamp out the confusion between class attributes and parameters that are passed to the constructor with the same name. In the above code block, we are creating a class name Student (by convention, the name of a class starts with a capital letter).
The constructor parameters are the values passed by the user while creating an object which is assigned to the class attributes. The class attributes and the constructor parameters can have different names, although it is a common practice to write similar names for both
class Student {
    constructor(firstNameInput, lastNameInput, ageInput, rollNoInput) {
    firstName = firstNameInput;
    lastName = lastNameInput;
    age = ageInput;
    rollNo = rollNoInput;
    }
}
JavaScript Class Methods
So far, we have created a class Student with different attributes to store the data. Now imagine if we have to display the data.
class Student {
    constructor(firstNameInput, lastNameInput, ageInput,                                 rollNoInput) {
        firstName = firstNameInput;
        lastName = lastNameInput;
        age = ageInput;
        rollNo = rollNoInput;
}
    name() {
        return `The student's name is ${firstName} ${lastName}`;
In the above code, the name() method is used to return the name of the Student. Upon being called, the name() method will return a string that has the class attributes firstName and lastName
The methods of classes in javascript are mainly categorized into three kinds
Instance methods
static methods
Getters and setters
Using a JavaScript Class
Since the classes in JavaScript are just a blueprint, they cannot be used directly. To use the classes in JavaScript, we need to create an object. The object in JavaScript is a standalone entity created by the user that has properties and types. It can be defined as the physical entity built upon a class definition.
var s1 = new Student('Peter','Parker',16, 48);
The new keyword in JavaScript creates an instance of an object that has a constructor function. The above code will create an object s1 from the Student. The parameters 'Peter', 'Parker', 16, and 48 will be passed to the constructor, which will be assigned to the class attributes.
The Constructor Method
The constructor() is a method used to initialize the attributes in JavaScript classes. When an object is created, its class's constructor() method is called.
If the classes in JavaScript are defined without any constructor, the JavaScript class, upon initialization, automatically creates an empty constructor.
The constructor method in the JavaScript class can either be empty or may take parameters.
Syntax:
constructor() {
    ...
}
The constructor method inside Javascript classes is created using the constructor keyword.
The () contains parameters that may be assigned to the JavaScript class attributes.
The {} contains the definition of the method.
class Programming {
    constructor() {
        console.log('Programming class is called');
    }
}
let p1 = new Programming();
// Output: Programming class is called
In the above example, we have created a JavaScript class Programming, inside which we have created a constructor which will print "Programming class is called" in the console upon being called. When the object p1 is made, it initiates the Programming class, which automatically initiates the constructor method inside the javascript class, thus "Programming Class is called" is displayed in the console.
Extending a Class
One of the most useful features of OOP in javascript is inheritance. Inheritance allows us to define a new class that will take all the functionality from a parent class, thus extending that class while having its functionalities. Classes in JavaScript are extended or inherited from other classes using the extends keyword.
class Color extends Student {
    constructor(firstNameInput, lastNameInput, ageInput, rollNoInput, language) {
    super(firstNameInput, lastNameInput, ageInput, rollNoInput)
    this.language = language
    }
    displayLanguage() {
        return `${firstName} codes in ${languages}`;
    }
}
let c1 = new Coder();
Note: The super keyword is used to access and call functions on an object's parent. In the above code, we defined the class Coder with the attribute language and method displayLanguage() to display the language. The class Coder extends the class Student thus, it would have access to the attributes and methods of the Student.
Class Fields
Fields are the variables of the classes in JavaScript that are used to store the information. These are two types of fields in a JavaScript class:
Instance field
Static field
Both instance field and static field are further divided into public and private.
Instance Fields
Private Instance Field
By default, the attributes of classes in javascript are public, thus, they can be accessed and modified outside the class. So, to prevent this, we declare a private class field. Private instance fields are declared by adding a # prefix before the variable name.
Public Instance Field
By default, the attributes of classes in javascript are public. Thus public instance fields can be declared by simply declaring variables in javascript classes.
class Person {
    #age = 0; // Private instance field
    name = ""; // Public instance field
    constructor(name) {
        this.name = name;
    }
    birthday() {
        this.#age++;
    }
    displayAge() {
        return `Age: ${#age}`;
    }
}
let p1 = new Person('Jon');
console.log(p1.name); //Jon
p1.name = 'Peter';
console.log(p1.name); // Peter
p1.birthday;
console.log(p1.displayAge); // 1
p1.age = 10;  // returns error
In the above example, the variable age is declared as a private field, thus when we call p1.birthday it initiates the birthday method inside the class, which increments the age by 1, but when p1.age is assigned the value 10, it returns an error as we cannot access the private fields outside the class.
The variable name is declared as a public field thus when we make an object with the constructor parameter Jon, it sets the value of the name as Jon, but when we assign the value Peter to the name attribute outside the class, it updates its value.
Static Fields
Private Static Field
A private static field is created by adding the static keyword before a private instance field declaration.
Public Static Field
A public static field is created by adding the static keyword before a variable name.
class Person {
    static #age = 0; // Private instance field
    static name = ""; // Public instance field
    constructor(name) {
        this.name = name;
    }
    birthday() {
        this.#age++;
    }
    displayAge() {
        return `Age: ${#age}`;
    }
}
let p1 = new Person('Jon');
console.log(p1.name); // Jon
console.log(p1.#age); // Displays error
In the above example, the variable #age is declared as a static private field, thus it is accessible only within the User class thus p1.age would display an error while name being a public static method can be accessed from anywhere thus p1.name outputs Jon.
Getters and Setters Method
The private attributes of a class cannot be accessed directly by an object. Also, it is common practice not to directly interact with the attributes inside the classes in Javascript. Thus, to access the attributes of the JavaScript class, we use getter and setter methods.
Getter Method
The getter methods are used to get or access the values of attributes of classes in JavaScript. The getter methods are declared by adding the get keyword before the method name.
Setter Method
The setter methods are used to set or manipulate the values of attributes of classes in JavaScript. The setter methods are declared by adding the set keyword before the method name.
class Programming {
    constructor() {
        console.log('Programming class is called');
    }
    get getLanguage() {
        return this.language;
    }
    set setLanguage(x) {
        this.language = x;
    }
}
let p1 = new Programming();
console.log(p1.getLanguage); // Output: undefined
p1.setLanguage = 'JavaScript';
console.log(p1.getLanguage); // Output: JavaScript
In the above example, the getLanguage() method in the getter method returns the language attribute of the javascript class and the setLanguage() method in the setter method takes a parameter and assigns that to the language attribute of the Javascript class.
Upon creating the p1 object, since we have not assigned any value to the language attribute, the getter p1.getLanguage will output undefined. Now, we will use the setter p1.setLanguage to set the value of the language attribute to JavaScript. Now, upon calling the getter p1.getLanguage, it will output JavaScript.
Hoisting
Hoisting in JavaScript is the process where the interpreter appears to move the declarations variables of functions or classes to the top of their scope, before the execution of the code. The classes in JavaScript, unlike the functions, are not hoisted on the top of the scope i.e.,JavaScript class cannot be accessed before its a declaration in the program
let p1 = new Programming();
class Programming {
    constructor() {
        console.log('Programming class is called');
    }
}
In the above example, the line let p1 = new Programming(); will output as ReferenceError as the interpreter couldn't find the Programming class.
'use strict'
The 'use-strict' or strict mode in JavaScript is an ES5 addition that is used to specify that the JavaScript code should be executed in the strict mode.
Following are some of the changes that the use-strict introduces to JavaScript:
It replaces silent errors in JavaScript code to throw errors
Adds syntax restrictions i.e., it prohibits some declarations that could have been done in JavaScript code if the 'use-strict' were not present.
Rigorous checking makes the program more optimal.
The classes in JavaScript always follow the 'use-strict' i.e, the code inside the JavaScript classes is always in the strict mode.
Computed Names [...]
The Computed Names property was added to JavaScript in the ES6 adaption to allow the names of object properties in JavaScript object literals to be determined dynamically.
The JavaScript objects are a kind of director, thus the idea behind this feature was to use a key-value kind of syntax (['keyStr']= value) where keyStr is a dynamically created string used as a key.
const keyStr = 'age';
const Person = {
    firstName: 'Raj',
    lastName: 'Sharma',
    [keyStr]: 30
}
console.log(Person.age) // 30
In the above example, we have created an object literal Person with three keys firstName, lastName and [keyStr]. Here the third key holds dynamic value and depends on the value of keyStr. Thus when we call Person.age it outputs the value of [keyStr] in the string.
Making Bound Methods with Class Fields
The "this" keyword in JavaScript is used to refer to the Object it belongs to. Thus it may keep obtaining different values according to the context.
Thus when an object method is passed around and called some other context, the object reference of this keyword will change. This problem is often known as losing this in JavaScript.
class Person {
    constructor(name) {
        this.name = name;
    }
    sayName() {
        console.log(this.name)
    }
}
let p1 = new Person('Peter');
setTimeout(p1.sayName, 100); // undefined
In the above example, we have declared a class Person with an attribute name. Now the constructor is supposed to set the value of an attribute to the parameter and the sayName() method is supposed to print Peter. But the output is undefined because the setTimeout() method has got the p1.sayName separately from the object, thus it has lost the user context.
Note: The Javascript setTimeout method acts differently in the browser. i,e., it sets this = window for the function call. Thus in case of this.name it tries to get window.name which does not exist, in such cases, it usually becomes undefined.
There are two ways to fix this issue
By passing a Wrapper function - The losing "this" issue can be fixed by passing the wrapper functions such as setTimeout(()=> p1.sayName(), 100) to tackle the issue of the setTimeout() function.
class Person {
    constructor(name) {
        this.name = name;
    }
    sayName() {
        console.log(this.name);
    }
}
let p1 = new Person('Peter');
setTimeout(() => p1.sayName(), 100)
By Binding the Method to Object: The "losing this" issue can also be solved by binding the object with the method. This could be done inside the constructor or any defined method.
class Person {
    constructor(name) {
        this.name = this.name.bind(this);
    }
    sayName() {
        console.log(this.name);
    }
}
let p1 = new Person('Peter');
setTimeout(p1.sayName, 100);
No Arrow Function
The arrow function was introduced in ES6. An arrow function expression can be defined as an alternative to regular functions, having compact syntactical features although it does not have its bindings to the keywords like this, super, arguments or new.target etc
An arrow function cannot be used as a constructor and they are considered as methods.
The arrow function has no Prototype Property
The arrow function does not have the prototype property.
// function keyword declaration
var programming1 = function(language) {
    this.language = language;
};
programming1.prototype.framework = function() {
    return 'ReactJS';
}
// arrow function declaration
programming2.prototype.framework = () => 'ReactJs';
programming2.prototype; // undefined
In the above example, the declaration programming1.prototype.framework is valid as it is done using the function approach but the declaration 'programming2.prototype' returns undefined as the arrow functions do not support the prototype property.
Arrow Function has no New Operator
The arrow functions can not be used as constructors.
// function keyword declaration
const Programming1 = function() {};
const coder1 = new Programming1;
// Arrow function declaration
const Programming2 = () => {};
const coder2 = new Programming2();
// TypeError: Meal is not a constructor
In the above example, the declaration 'coder1' is valid as it is done using the function approach but the declaration 'coder2' returns TypeError as the arrow functions do not support the new keyword thus making the new Programming2 an invalid declaration.
Class Features Availability
The public and private static fields and private static methods have been made part of the Class static features proposal.
The Public and private instance fields have been made part of the Class fields proposal.
The Private instance methods and accessors have been made part of the Class private methods proposal.
Class vs Custom type
| Class | Custom type |
| Class declarations are not hoisted, i.e. they cannot be accessed above their declaration in the code. | function declarations are hoisted, i.e. they can be accessed above their declaration in the code. |
| The code definition inside the classes in Javascript, by default, executes in the 'use-strict' mode. | The code definition inside the function in javascript do not execute in the 'use-strict' mode. |
| Classes in Javascript are non-enumerable, i.e. its objects can have properties that don't show up when iterated. | Functions in javascript are enumerable. |
| We need the new keyword to call the class while making an object. | No additional keywords are required in the custom type of functional method. |
Creating user-defined object
In Object-Oriented programming, everything revolves around objects.
const user = {
    name: 'John',
    accountType: 'basic'
}
Consider I have a website that has thousands of users. In that case, I'll have to create thousands of such objects. Right? Is this the best way to store our user's data? Certainly not! We should create a prototype for the Object User and then create instances of the prototype.
new ClassName(listOfArguments);
Parameters:
className: The new keyword is followed by the name of the class/prototype for which we want to create an instance.
ListOfArguments: Inside the parentheses, we pass the list of arguments to the constructor function defined inside the prototype.
// Defining this prototype for the Object User
const user = function(name, accountType) {
    this.name = name;
    this.accountType = accountType;
}
// Creating 2 instances of User
const user1 = new User('John', 'basic');
const user2 = new User('Marry', 'Premium');
Advantages of Creating a Prototype First
It keeps our data uniform: Consider if some of the objects are created with an extra attribute, maybe lastName. This will make our data inconsistent. On the other hand, we define what an instance of the User object can hold by creating a prototype. Here, a user object can only hold a name and account type. Even if we pass an extra parameter while creating an instance, it will not be bound to that object.
Bind Data Functions: We can bind 'data functions' to the prototype and use them to manipulate the object instances. This helps encapsulate data attributes and data functions together.
Defining the Prototype
The syntax for creating a basic blueprint of the object.
Use of this and new keywords in JavaScript.
const User = function(name, accountType) {
    this.name = name;
    this.accountType = accountType;
}
It is recommended to start the object prototype name with a capital letter. The code above shows the functional way of creating a prototype. By that, I mean creating a function and assigning it to a variable name.
The 'this' keyword binds the object with its attributes and functions. So, whenever, we create an instance, these data attributes and data functions will be bound to that instance. We are only assigning attributes.
Let's create the instance of this prototype. Since this prototype is created by the following functional paradigm.
const User = function(name, accountType) {
    this.name = name;
    this.accountType = accountType;
}
const user1 = User("John","basic");
console.log(user1)
undefined
Whenever a function makes use of this keyword and there is a regular function call like this: User("John", "basic") this keyword looks at the window object. i.e., looks at the global scope. It finds nothing here. Hence, we get undefined.
Few things happen when you call a Function Using the New keyword.
Highlights:
new keyword in JavaScript creates a new object with variables and functions bound to it.
new bind this to the new object.
The new keyword first creates a new empty object.
Then, it binds the newly created object to the prototype of the constructing function.
The new keyword in JavaScript takes care of this keyword. We know that whenever there is a regular call of a function, this keyword always points towards the global scope to find its value. Using the new keyword shifts the focus from global scope to the inside of this newly created object, giving us the correct output.
Therefore, the new keyword in JavaScript binds the data variables and data functions defined inside the constructing function. Finally, it returns the newly created object.
user1 is the instance of the prototype User. It has all the properties defined in the User prototype constructor(i.e., name and account type), along with the [[Prototype]].
What is [[Prototype]]
[[Prototype]] is an object of all the functions that are bound to a data structure by default in JavaScript. All the data structures in JavaScript have some functions bound to them. We don't need to define these functions anywhere. [[Prototype]] consists of those functions.
const User = function(name, username) {
    this.name = name;
    this.username = username;
    this.getName = function() {
        return this.name;
    }
}
const user1 = new User("John", "johnsmith");
console.log(user1.getName()); // John
The new keyword binds
Data Variables
Data Functions
[[Prototype]] -> functions present by default with the newly created object, and we can then access all of them by simply using the(.) operator.
New with Classes
The same concept can be extended to classes as well. We know that classes are not created in JavaScript. The class keyword is just a syntactic sugar over the traditionally used constructor functions. With ES6 came the support for the class keyword. Hence, we now use classes to create prototypes and create instances using the new keyword.
class Student {
    constructor(firstName, lastName) {
        this.firstName = firstName,
        this.lastName = lastName
    }
    displayFullName = function() {
        return `${firstName} ${lastName}`;
    }
}
// Creating instances using the new keyword
const student1 = new Student('Mary', 'Green');
const student2 = new Student('Lary', 'Smith');
Why do we need Constructors?
In JavaScript, a constructor is used when we want to create multiple objects which have the same properties and methods. Constructors are a special kind of function used to create and instantiate objects.
In JavaScript, a single object can be created using the Object Literal as follows:
const student1 = {
    name: "abc",
    id: '101'
}
Notice that there's a problem here, if we were to create another student object, say student2 then we would again need to write another object as:
const student1 = {
    name: 'abc',
    id: 101
}
const student2 = {
    name: 'xyz',
    id: 102
}
This would create a lot of code repetition when there are a large number of objects, hence to create multiple objects of a similar kind we use constructors. They can be created in two ways
Using the Constructor Function
Using the Constructor Method ( ES6+ way)
Takeaway: Constructors are used when we want to create multiple objects of the same kind. Constructors can be created in two ways using Constructor Functions or using Constructor Methods.
Syntax:
A constructor is created similarly to a regular function, with the function keyword followed by the name and arguments. The convention is that the first letter of a constructor's name should be capitalized.
function ConstructorName (arg1, arg2 ....) {
    // body
}
function Student(name, id) {
    // body
}
Takeaway: A constructor function is created in the same way as a regular function except that the first letter of its name should be capital.
How to use a Constructor?
To use a constructor we have to call it and for that, we use the new keyword.
function Student(name, id) {
    this.name = name;
    this.id = id;
}
const student1 = new Student("abc", 101);
const student2 = new Student("xyz", 102);
console.log(student1);
console.log(student2);
Explanation: When we use the new keyword the constructor is called. In the constructor, we bind the given arguments to the properties of the object. To use a constructor we need to use the new keyword this will invoke the constructor.
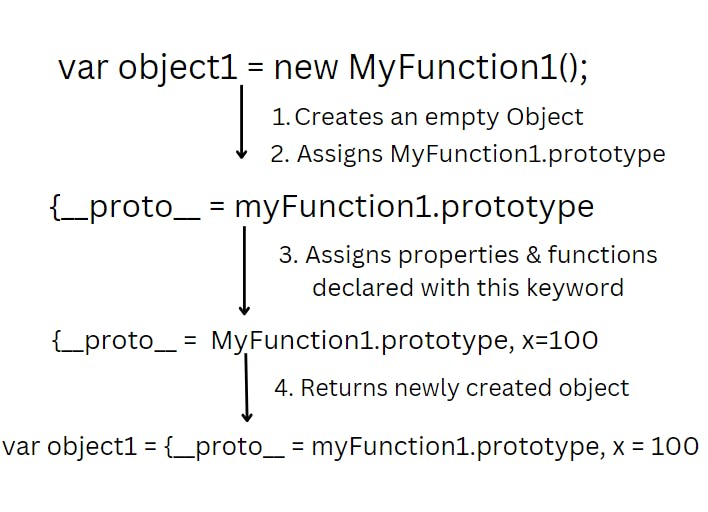
What happens when a Constructor is called?
We have seen that to use a constructor we have to call it now let's see what happens under the hood of that process. When we use the new keyword the following things happen:
An Empty Object is created
this is set to the newly created object.
The constructor is called
Inside the constructor, the given properties and values are bound to the newly created object by using this.arg = arg
The constructor returns "this" which means the object is returned since "this" is currently set to the newly created object.
Takeaway: When a constructor is called a new empty object is created, the "this" value is set to this object inside the constructor the properties and values are updated in the object using "this" keyword and finally the constructor returns "this" keyword.
Calling a Function Constructor without the New Keyword
We can call a function constructor without the new keyword just like how we would call a regular function
const student1 = Student('abc', 101);
The "new" keyword creates a new object and sets "this" to it, since we are not using new here the "this" value will point to the global object. Hence, when we try to access the properties of the object we will get the error:
console.log(student1.name);
TypeError: Cannot read properties of undefined
Takeaway: Calling a constructor without "new" is possible but gives an error when we try to access the object.
Constructor Mode Test: new.target
To prevent the constructor from being called without the new keyword "new.target" was introduced in ES6.
If a constructor is called with the new then the new.target will return a reference to the constructor function and if it is called without new it will return undefined.
This is useful because we can modify our code to either:
Force the users to use the new keyword by throwing an error.
We can create the object with new
          function Student(name, id) {
              if(!new.target) {
                  throw Error("Use the new keyword to call constructor");
              }
              this.name = name;
              this.id = id;
          }
          const student1 = Student("abc", 101);
Error: use the new keyword to call constructor
Explanation: Since we are calling the constructor without the new keyword new.target will return undefined, the if condition is triggered and the error is thrown.
function Student(name, id) {
    if (!new.target) {
        return new Student(name, id);
    }
    this.name = name
    this.id = id
}
let student1 = Student("abc", 101);
console.log(student1.name);
abc
Explanation: Since we are calling the constructor without the new keyword new.target will return undefined, and then the if condition is triggered and a new object is created.
Takeaway: new.target is used to prevent the users from calling the constructor without the new keyword. If a constructor is called with new then the new.target will return a reference to the constructor function if not it will return undefined.
JavaScript Built-in Constructors
JavaScript also provides some built-in constructors such as:
Object- Creates new Object object
Array - Creates new Array object
String - Creates new String object
Number - Creates new Number object
const a = new String("Hello World"); // A new String Object
const b = new Number(42); // A new Number Object
const c = new Object(); // A new Object object
const d = new Array("Awesome","Blogs"); // A new Array object
c.name = "abc";
c.id = 101;
console.log('String Created:', a);
console.log('Number Created:', b);
console.log('Object Created:', c);
console.log('Array Created:', d);
Output:
String Created: [String: 'Hello World']
Number Created: [Number: 42]
Object Created: {name: 'abc', id: 101}
Array Created: ['Awesome', 'Blogs']

**Explanation**
The `new` keyword creates an object out of the arguments specified in the built-in constructors.
Variable `a` is a String object with the value "Hello World".
Variable `b` is a Number object with the value 42
Variable `c` is an Object object with value {name: 'abc', id: 101}
Variable `d` is an Array object with value ['Awesome', 'Blogs']
JavaScript Constructor Function Parameters
JavaScript constructors can be created and invoked with and without function parameters.
How to define and invoke class Constructors with no Parameters?
To define a constructor with no parameters we must simplify and not include any parameters in the function definition.
The properties, if needed, need to be included inside the definition.
To invoke the constructor we call the constructor with the new keyword without given the arguments
  // Constructor Function
  function Student() {
      this.name = "abc",
      this.id = 101
  }
  // Creates an Object
  const student = new Student();
  console.log(student1);
Output: Student {name: 'abc', id: 101}Explanation: A Student Object with the given properties and values has been created and assigned to student1 variable.
How to Define and Invoke the Class Constructor with Parameters?
To define a constructor with parameters we must include the parameters in the function definition.
The properties and values need to be bound to the object using the "this" keyword.
To invoke the constructor we call the constructor with the new keyword with the arguments.
// Constructor Function
function Student(name, id) {
    this.name = name
    this.id = id
}
const student1 = new Student("abc", 101);
const student2 = new Student("xyz", 102);
Takeaway: JavaScript functions can be defined with and without parameters.
Adding Methods to JavaScript Constructor Functions
We can add methods to JavaScript constructor functions similar to how we have added other properties which are by using the "this" keyword.
function Student(name, id) {
    this.name = name
    this.id = id
    this.welcome = function() {
        console.log("Welcome", this.name)
    }
}
const student1 = new Student("abc", 101);
const student2 = new Student("xyz", 102);
Takeaway: Methods can be added to JavaScript Constructor functions similar to how we have added other properties which is by using this keyword.
Returning from Constructors
Usually, constructors do not have return statements as they implicitly return "this". But if there exists a return statement then two rules are allowed:
If an object is being returned then the object is returned instead of this
If a primitive is returned then the return statement is ignored and this is returned like usual.
Only an Object can override "this"
function Student(name, id) {
    this.name = name
    return {name: 'Sara'}
}
const student1 = new Student("Raj");
console.log(student1.name);
Output: Sara
Even though we have passed the name as "abc" since we are returning the object {name: "Sara"} this overrides the "this" object and ultimately we get the name as "Sara"
function Student(name , id) {
    this.name = name
    return 42
}
const student1 = new Student("abc");
console.log(student1.name);
abc
Explanation: Since we are returning a primitive value the return statement is ignored and we see that the student1 variable has an object value and we can successfully access the name property in it.
Takeaway: A constructor always implicitly returns this except when the constructor has a return statement that returns an object, in this case, the object is returned.
JavaScript Object Prototype
Though it is not obvious there exists an issue when we directly add methods to constructors like we have been doing.
Each time we create a new Student object we also create a this.welcome() method, it is getting duplicated every time.
To handle this we add methods to constructors in JavaScript by using prototypes.
A prototype is an object present in every JavaScript function and object by default. We can add properties and methods to an Object by using this prototype.
function Student(name, id) {
    this.name = name
    this.id = id
}
const student1 = new Student("abc", 101);
const student2 = new Student("xyz", 102);
Student.prototype.programmer = function() {
    console.log(this.name, " is a programmer");
}
console.log(student1.programmer());
console.log(student2.programmer());
Explanation: The prototype of an object can be accessed using dot notation. Here we access the Student prototype and add a method called programmer to it. When the constructor is called for student1 and student2 objects, the programmer method is added to the prototype of these objects. Programmer method added to student1 and student2
Takeaway: A prototype is a default object present in all functions and objects in JavaScript it can be used to add methods and properties to an object.
Constructors in ES6
We have seen constructor functions till now, in ES6, classes and constructor methods were introduced, these are just syntactic sugar built on top of Constructor functions and prototypes the functionality is the same.
Constructor method syntax:
Constructor methods are used inside classes. They are written as:
class className {
    Constructor(arg1, arg2, ... argN) {
        // code
    }
}
Constructor Method Example
class Student {
    constructor(name, id) {
        this.name = name
        this.id = id
    }
}
const student1 = new Student('abc', 101);
const student2 = new Student('xyz', 102);
console.log(student1);
console.log(student2);
Student { name: 'abc', id: 101 }
Student { name: 'xyz', id: 102 }
Explanation:
Constructor methods work the same as constructor functions.
When the new keyword is used empty object is created, this is set to the new empty object, the constructor is invoked and inside the constructor, the properties and values are bound to the object using this and finally, this is returned.
Takeaway: Classes and Constructor methods added in ES6 are syntactic sugar created on top of function constructors and prototypes. Constructor methods have the same functionality as Constructor Functions.
Introduction to Inheritance in JavaScript
Inheritance refers to the act of inheriting something. It could be a child inheriting the property of their parents or a new species inheriting some of the older species during evolution. The latter entity is inheriting the properties of the previous entity. Also, we can observe that the later entity has some functionalities that either weren't present in the previous one or their execution has been improvised. Even in programming, the concept of inheritance exists.
Inheritance in JavaScript aids a new class to have all the functionality of another class while having its functionality as well. "The inheritance in JavaScript primarily involves two segments:
Child Class: The class which inherits the properties of another class is known as the child class.
Parent Class: The class whose property is being inherited is known as the parent class.
JavaScript Class Inheritance
Class Inheritance
Before the ES6 version was introduced, inheritance in JaavaScript used to be implemented in multiple steps. A common method of inheritance in JavaScript was prototypal inheritance.
In Prototypal Inheritance, an object is used to inherit the functions and attributes from another object through prototype linkage.
Note: It should be noted that we don't have actual classes in JavaScript but ES6 has been provided with the abstracted form of classes which are prototypes only.
Upon the Introduction of ES6, a new way of inheritance in JavaScript was proposed using keywords like extends, super etc.
extends
The extends keyword is used for developing the inheritance between two classes.
childClassName extends parentClassName {
    // Child Class Definition
}
The extends keyword is placed between the child class and the parent class.
class Animals {
    constructor(name) {
        this.name = name;
    }
    animalName() {
        return `${name}`;
    }
}
class Pets extends Animals {
    constructor() {
        console.log(`Pet class is created`);
    }
}
In the above example, we have declared a class of Animals with an attribute name and a method animalName(), which will return the name. Now, since the Pets class extends the Animals class, thus it inherits all properties of the Animal class.
JavaScript super() keyword
The super keyword in JavaScript is used to call functions of an object's parent class. When we make objects from the child class, we need to pass the parameters to the parent class as well. This is done by the super() keyword. It invokes the attributes of the parent class.
super(param);
It is placed inside the constructor of the child class and the param is the parameter(s) required for the Parent class.
class Pets extrends Animals {
    constructor(name, species) {
        super(name);
        this.species = species;
    }
    speciesName() {
        return `${species}`;
    }
}
In the above example, we have defined the Pet class. Since it inherits the Animals class thus, its super keyword is called the constructor of the Parent class. And hence the value is being assigned.
class Foo {
    static ClassMethod() {
        return `hello`;
    }
}
class Bar extends Foo {
    static classMethod() {
        return super.classMethod() + ', too';
    }
}
console.log(Bar.classMethod()); // 'hello, too'
Overriding Method or Property
So far we have seen how we can inherit properties from one class to another. Now imagine in the above example, the Animal class has a method called greet() that returns the name attribute. But for the Pet class, we want this method to return the name as well as the species.
The given case is an example of the re-writing definition of a method in the parent class. This is known as "Method Overriding"
Method Overriding in JavaScript is a property that allows a child class to impart a specific implementation of a method that is already provided by its parent classes.
// Parent Class
class Animals {
    constructor(name) {
        this.name = name;
    }
    animalName() {
        return `${name}`;
    }
    greet() {
        return `Hello I am ${name}`;
    }
}
// Child lass
class Pets extends Animals {
    constructor(name, species) {
        super(name);
        this.species = species;
    }
    speciesName() {
        return `${species}`;
    }
    greet() {
        return `Hello my name is ${name}, I am a ${species}`;
    }
}
const pet1 = new Pet('Tom', 'Dog');
console.log(pet1.greet);
In the example, we are creating a Pets class while inheriting the Animals class. Here, both Pets and Animals have the greet() method with different definitions, but when we call the greet method for the object pet1, it will return 'Hello my name is Tom, I am a Dog' because the greet method inside the Pets class overrides the greet method inside Animals class.
Overriding Constructor
When we inherit a parent class without declaring the constructor of the child class, by default, javascript creates the following empty constructor
constructor(...args) {
    super(...args);
}
But, when we are adding our constructor definition in the child class, it is known as constructor overriding.
Note: It is necessary to pass the attributes of the parent class with the super keyword while overriding the constructor.
class Animals {
    constructor(name) {
        this.name = name;
    }
}
class Pets extends Animals P
    constructor(name, species) {
        super(name);
        this.species = species;
    }
}
In the above example, the Pets class is inheriting the Animals class. We have overridden the constructor method of Animals by defining a new constructor in the Pets class.
class Person {
    constructor(name, age, collegeName) {
        this.name = name;
        this.age = age;
        this.collegeName = collegeName;
    }
    displayName() {
        return `${this.name}`;
    }
    displayAge() {
        return `${this.age}`;
    }
    displayCollegeName() {
        return `${this.collegeName}`;
    }
    greet() {
        console.log(`Hello I am ${this.name} and I am from ${this.collegeName}`);
    }
}
class Professor extends Person {
    constructor(name, age, collegeName, subject, yoe) {
        super(name, age, collegeName);
        this.subject = subject;
        this.yoe = yoe;
    }
    greet() {
        console.log(`Hello I am ${this.name}, I am professor at ${this.collegeName} and I have been teaching for past ${this.yoe} years`};
    }
    displaySubject() {
        console.log(`${this.subject}`);
    }
}
class Student extends Person {
    constructor(name, age, collegeName, branch, rollNo) {
        super(name, age, collegeName);
        this.branch = branch;
        this.rollNo = rollNo;
    }
    greet() {
        console.log(`Hello I am ${this.name}, rollNo: ${this.rollNo} and I am student at ${this.collegeName}`);
    }
    displayBranch() {
        console.log(`${this.branch}`);
    }
}
let s1 = new Student('John', 18, 'Howgarts', 'CSE', 1101);
s1.greet();
let p1 = new Professor('Peter', 45, 'Howgarts', 'Web Technologies', 15);
p1.displayBranch();
p1.displayName();
Inheriting Static Members
The static attributes and methods of the parent class are also inherited during inheritance in JavaScript. The inheriting static members in JavaScript belong to the class and are not part of the instantiated object.
class Car {
    constructor(color) {
        this.color = color;
    }
    display() {
        console.log(`This car is ${this.color} in color`};
    }
    static greet() {
        console.log('Welcome!!');
    }
}
class Skoda extends Car {
    modelName() {
        console.log(`This is a Skoda`);
    }
}
Skoda.greet(); // Welcome!!
In the above example, we have created two classes, Car and Skoda where Skoda is inheriting Car, thus, it will inherit its static methods and attributes as well. Thus, Skoda.greet() will output "Welcome!!"
Inheriting from build-in types
Inheritance in JavaScript allows us to inherit non-primitive built-in types in JavaScript such as an array, set, map etc.
class Queue extends Array {
    enqueue(e) {
        super.push(e);
    }
    dequeue(e) {
        return super.shift();
    }
    peek() {
        return !this.empty() ? this[0] : undefined;
    }
    empty() {
        return this.length === 0;
    }
}
let students = new Queue();
students.enqueue('Jon');
students.enqueue('Peter');
students.enqueue('Loki');
console.log(students.pop()); // Loki
Uses of Inheritance
Following are some of the uses of inheritance in JavaScript:
Inheritance in JavaScript helps to organize the data in a hierarchical form.
Inheritance in JavaScript allows us to inherit properties from another class, thus making the class definitions less complex.
Inheritance in JavaScript also makes the code debugging friendly.
Inheritance in JavaScript allows us to add our properties in child classes as well; thus, we can override some methods of parent classes while inheriting the ones that are needed.
Encapsulation in JavaScript
Encapsulation can be defined as "the packing of data and functions into one component". Packing which is also known as bundling, grouping and binding simply means bringing together data and the methods which operate on data. The component can be a function, a class or an object.
Packing enables "controlling access to that component". When we have the data and related methods in a single unit, we can control how is it accessed outside the unit. This process is called Encapsulation.
What is Encapsulation in JavaScript?
You might already be familiar with systems like vending machines, bank lockers or even a purse. All of these contain some items in them. Items that are contained within a system are made available to use through the system.
For example, you can not directly access a snack from a vending machine without having to use the machine. The vending machine has a few defined procedures which allow you to access the items in it. This is exactly what is meant by Encapsulation. In the world of programming, encapsulation is the bundling of data with the methods that operate on that data.
Working of Encapsulation in JavaScript
let student = {
    id: 12,
    name: "Issac"
    marks: 81
}
console.log(student.id); // 12
console.log(student.name); // Issac
console.log(student.marks); // 81
Everything looks fine till you add the below code
let student = {
    id: 12,
    name: "Issac",
    marks: 81
}
student.marks = "Ninty One";
console.log(student);
// { id: 12, name: 'Issac', marks: 'Ninety One'}
We don't want marks to store a string value
How can we control access to attributes of this object?
Encapsulation may be the answer here. With encapsulation, we can ensure that we give direct access to data to the associated methods in the object and further give access to these methods to the outer world.
let student = {
    id: 12,
    name: "Issac",
    marks: 81,
    setMarks: function(newMarks) {
        if(isNaN(newMarks)) {
            throw new Error(`${newMarks} is not a Number`);
        }
        marks = newMarks
    }
}
student.setMarks("Eight Five");
// VM563:7 Uncaught Error: Eighty Five is not a Number at Object.setMarks(<anonymous>:7:10) at <anonymous>:1:9
But does this mean that the outer world has no direct access to internal data? No, it does not
student.marks = "Eighty Five";
// { id: 12, name: 'Issac', marks: 'Ninety One'}
Now, how do we ensure that the outer world has no direct access to data
Ways of Achieving Encapsulation in JavaScript
Trying for Encapsulation in JavaScript using the Functional Scope
Since a variable inside the functional scope can not be accessed from outside, we can restrict direct access to data using the functional scope.
function student() {
    var id = 12
    var name = "Issac"
    var marks = 81
    function setMarks() {
        if (isNaN(newMarks)) {
            throw new Error(`${newMarks} is not a number`);
        }
        marks = newMarks;
    }
}
The idea is when this function is used in place of a plain object, we will be able to restrict direct access to those contained in it. Using this, variables id, name and marks are not accessible from the outer scope. But this also means that we will not be able to access the inner getter and setter methods. This looks like half baked solution. We will further enhance the above concept.
Achieving Encapsulation using Closures
A Closure is the combination of a function bundled together with references to its surrounding state. This means a function can remember the variables from the scope it was defined in, even when it now lives outside that scope.
function startGame() {
    var points = 0;
    function showPoints() {
        alert(points);
    }
    showPoints();
}
startGame();
In the above example, "points" is a local variable inside the scope of the function "startGame". The inner function "showPoints" is the closure that uses the variable declared in the outer function "startGame".
Another example of understanding closures could be when the inner function is returned from the outer function and by closure, it can access the variables defined in the outer function at the time of the call.
 function squareArray() {
    let data = [1, 2, 3, 4, 5, 6];
    function square() {
        for(let i=0; i<data.length; i++) {
            data[i] = data[i] * 2;
        }
        return data;
    }
    return square;
}
let square = squareArray();
let squaredArray = square();
console.log(squaredArray);
// [2, 4, 6, 8, 10, 12]
Here, the inner function square has access to "data" even when "square" is called outside the scope of the outer function squaredArray
Let us now understand how can closures help in Encapsulation
The first thing to be achieved here is to restrict access to inner data. Since data inside a function scope is not accessible outside the function, we initialize the object as a function and declare the variables id, name and marks inside it.
let student = function() {
    var id = 12;
    var name = "Issac";
    var marks = 81;
}
console.log(student.id) // undefined
Now that we have restricted access, we would want to use the methods which operate on the data.
let student = function() {
    var id = 12;
    var name = "Issac";
    var marks = 81;
    function setMarks(newMarks) {
        if (isNaN(newMarks)) {
            throw new Error(`${newMarks} is not a number`);
        }
        marks = newMarks;
    }
{
student.setMarks(20);
```
This does not seem to work because "student" can not reference the inner function "setMarks" directly. Let us understand how closure helps in solving this problem.
```
let student = function() {
    var id = 12;
    var name = "Issac";
    var marks = 81;
    var object = {
        setMarks: function(newMarks) {
            if(isNaN(newMarks)) {
                throw new Error(`${newMarks} is not a number`);
        }
        marks = newMarks;
    }
    return object;
}();
student.setMarks(92); // Works now
We created an object inside the function, added a setMarks method and returned the object. This means whenever the function is called, the object containing the method will be returned and thus the setMarks method will be accessible to the outer world while protecting the data we do not want to share. You should note that the function is immediately invoked.
If you check the type of "student", it will be an object rather than a function. This is because the function was immediately invoked and it returned an object whose reference is stored in the student variable.
console.log(student)
// { setMarks: f}
How do we access the other data?
While we do not want the outer environment to edit the inner data, we still want to access it. This is where we will introduce getters. This means all operations which are needed on data will have to be in the form of the methods which will be returned within the object "obj".
let student = function() {
    var id = 12;
    var name = "Issac";
    var marks = 81;
    var obj = {
        setMarks: function(newMarks) {
            if(isNaN(newMarks)) {
                throw new Error(`${newMarks} is not a number`);
            }
            marks = newMarks;
        },
        getMarks: function() {
            return marks;
        },
        getName: function() {
            return name;
        },
        getId: function() {
            return id;
        }
    }
    return obj;
}();
console.log(student.getMarks()) // 81
student.setMarks(98);
console.log(student.getMarks() //98
student.setMarks("Ninty");
// VM2179:8 Uncaught Error: Ninty is a not a number at Object.setMarks(<anonymous>:8:13) at <anonymous>:21:9
We now see the expected behaviour. We can control access to the data inside a component.
Encapsulation using Private Variables
Classes were introduced in ES6. Using classes, Encapsulation can be achieved in a more standard way. We begin with defining the "Student" class. Like all major programming languages, we can think of a class as a blueprint here.
class Student {
    constructor(id, name, marks) {
        this.id = id;
        this.name = name;
        this.marks = marks;
    }
    getMarks() {
        return this.marks
    }
    setMarks(marks) {
        this.marks = marks
    }
}
let s = new Student(1, "harsh", 85);
This appears to be a standard solution, but if you examine it carefully, you can access the properties of this object directly.
let s = new Student(1, 'harsh', 85);
s.marks = 122
console.log(s); // Student {id: 1, name: 'harsh', marks: 122 }
This is because, unlike most other languages, data hiding is not inherent to the classes in JavaScript. This means that by default, properties can be accessed and modified from the outer world. You should note that properties declared within an object/class are not the same as variables in JavaScript. You can see this difference in the way object properties are defined without any var/let/const keyword.
If we start using variables instead of properties, we might just be able to achieve Encapsulation. Since variables are lexically scoped, they are not accessible from outside the scope they are defined in.
class Student {
    constructor(id, name, marks) {
        let _id = id;
        let _name = name;
        let _marks = marks;
        this.getId = () => _id;
        this.getName = () => _name;
        this.getMarks = () => _marks;
        this.setMarks = (marks) => {
            _marks = marks;
        }
    }
}
let s = new Student(1, "harsh", 85);
s.getId() // 1
s.getName() // harsh
s.setMarks(90)
s.getMarks() // 90
Here, we declare the properties within the scope of the constructor instead of defining them as properties at the object level. We then define the constructor and initialise the object properties as variables within the scope of the constructor.
Advantages of Encapsulation
Protection of Object against Illegal Access
Encapsulation guarantees that we are in control of what is accessible from outside the object.
Decoupling Implementation Details
Since Encapsulation enables operating on data using a public interface, it is easier to update the implementation because the tight coupling is eliminated. This is an excellent way to always code against an interface. This also means that with Encapsulation, the object is scalable to accommodate future changes without breaking compatibility.
The "Coupling" means the extent to which two modules are dependent on each other. Decoupling refers to eliminating such dependencies.
Shared Mutable State
It also eliminates more than one party operating on the same data at the same time, which might create a race condition. Imagine an object without Encapsulation being updated by two asynchronous functions.
let arrayOfThree = function() {
    let data = [1, 2, 3];
    let object = {
        multiplyByTwo: function() {
            data = data.map(item => item * 2);
            console.log("After multiply", data);
        },
        divideByTwo: function() {
            data = data.map(item => item / 2);
            console.log("After Divide", data);
        }
    }
    return object;
}
let first = arrayOfThree();
let second = arrayOfThree();
setTimeout(first.divideByTwo, 2000);
setTimeout(second.multiplyByTwo, 3000);
Static Methods in JavaScript
A static method in JavaScript is a method that has a static keyword prepended to itself. Such methods cannot be accessed through instantiated objects but could be accessed through the class name. This is because static methods belong to the class directly. Inheritance applies to static methods too. Also, these methods can be invoked by non-static methods and even constructors. Static methods are used to create utility functions and create objects that contain default information.
class Square {
    constructor(side) {
        this.side = side;
    }
    findPerimeter() {
        return 4 * this.side;
    }
}
let square1 = new Square(3);
let square2 = new Square(7);
It is worthwhile to notice that, in the definition of the method findPerimeter, the keyword this is used. The "this" keyword in the method refers to the object through which the method would be invoked, the method gets bound to the object through which the invoking is happening.
Now, sometimes, we have a situation where we wish to invoke a method, but we do not want the method to be bound to an object.
Then, to which entity will the method be bound? The answer is class.
Static methods are those methods that are bound to the class. We can also say that static methods directly belong to the class.
The way the static method is different is that it cannot be accessed by any of the instantiated objects of the class. Rather, the static method can only be accessed using the class name because it directly belongs to the class.
Syntax:
class Chat {
    static sendMessage() {
        return "You got me!!"
    }
}
```
Wrong way to instantiate sendMessage()
```
let myChat = new Chat();
myChat.sendMessage();
```
Right way to instantiate a static method
```
Chat.sendMessage();
Relationship between Static Method and Class
class Square {
    constructor(side) {
        this.side = side;
    }
    findPerimeter() {
        return 4 * this.side;
    }
    static comparePerimeter(square1, square2) {
        if (square1.side > square2.side) {
            console.log("First square has more perimeter");
        } else if (square1.side < square2.side ) {
            console.log("Second square has more perimeter");
        } else {
            console.log("Both have same perimeter");
        }
    }
}
let square1 = new Square(3);
let square2 = new Square(7);
Square.comparePerimeter(square1, square2);
Relationship between Static method and Object
There is no direct relationship that exists between a static method and an object. Objects are not allowed to access a static method. This happens because whenever a static method is defined in a class, the static method essentially gets stored inside the class's constructor.
A static method is not stored inside the class's prototype and hence becomes inaccessible for the objects. In JavaScript, objects can access only those members of a class that are stored inside the class's prototype.
Static Methods and this
Essentially, a static method belongs to a class. Hence, when we use this keyword inside the body of the static method, then this keyword refers to the class itself.
class Chat {
    static checkThis() {
        return this === Chat;
    }
}
We get the answer as true. This proves that this keyword inside a static method refers to the class that defined it.
Accessing Static Members from another Static method
Yes, even accessing static members from another static method is possible. Such accessing is achieved using this keyword. Suppose, we have a class User and three static members are defined in the class.
class User {
    static helloEmail = "hello@company.com";
    static checkValidEmail(email) {
        console.log("The email is valid");
    }
    static loginHelloEmail() {
        this.checkValidEmail(this.helloEmail);
    }
}
User.loginhelloEmail();
So, we see that the static method loginHelloEmail can access the static property helloEmail and the static method checkValidEmail through this keyword.
Accessing Static Members From A Class Constructor and Non-static methods
Accessing Static members from a Class Constructor
A class constructor can access a static member. Such access can be achieved through the class name.
class User {
    static helloEmail = "hello@company.com";
    static welcomeMessage() {
        return "Welcome to our team";
    }
    constructor() {
        console.log(User.helloEmail);
        console.log(User.welcomeMessage());
    }
}
As we can see above, the constructor is accessing the static property helloEmail and static method welcomeMessage through the class name User. Now, to execute the constructor, we need to create an object.
let user = new User();
// hello@company.com
// Welcome to our team!
Accessing Static Members from Non-Static methods
Non-static methods can access static members through class name just the way we saw in the case of the constructor
class User {
    static helloEmail = "hello@company.com";
    static welcomeMessage() {
        return "Welcome to our team!!";
    }
    greet() {
        console.log(User.helloEmail);
        console.log(User.welcomeMessage());
    }
}
let user1 = new User();
user1.greet();
Memory Allocation of Static method
Since the static method belongs to a class and is not accessible through objects, this means that the memory for the static method is allocated only once and is not dependent on the number of instantiated objects that are created. This also implies that the static method is not shared among instantiated objects because such a method cannot be invoked through any of those instantiated objects.
Why do we need a Static method
There could be two possible use cases where we wish to have a static method:
To Create Utility Functions
Let's see an example to understand how a static method could be used as a utility function.
class User {
    constructor(firstName, lastName, id) {
        this.firstName = firstName,
        this.lastName = lastName,
        this.id = id
    }
}
And we have instantiated numerous objects of the class User. Now, if we wish to have a method for deleting a certain instantiated object, then declaring that method as a static method would be a good decision.
static delete({ id }) {
    // logic to delete the corresponding object
}
So, suppose we need to delete an object called user1, then User.delete(user1) will do the needful. Now, we may argue that the same deletion task could be performed by a non-static method.
But, we need to understand that deleting an object should be done by a method that is more related to the class whose type the object is. This makes things more meaningful. Just like when we wish to create any variable in JavaScript, we strive to give it a name that ultimately describes what the variable does. Similarly, when we see that a method we are going to define would bear a relation to the class rather than an instantiated object, we declare that method as static.
To create Objects containing Default information
Consider the following static method createDefault inside a class User.
class User {
    constructor(firstName, lastName, id) {
        this.firstName = firstName;
        this.lastName = lastName;
        this.id = id;
    }
    static createDefault() {
        return new this("defaultUser", "defaultUser", 0);
    }
}
So, whenever we wish to create an object with default information, we need not create that object by ourselves. Instead, we can just invoke createDefault static method and we will get a new object with that information.
Such a method is helpful when we want to create that kind of this object, but we do not know what is the default information that object would contain.
{
    firstName: "defaultUser"
    lastName: "defaultUser"
    id: 0
}
Here, we see that invoking the method using the class name is creating some meaning. The meaning is that when we write the expression User.createDefault(), we come to an understanding that the method is going to create something of class type User.
Difference between Static and Non-Static methods in JavaScript
| Static method | Non-static method |
| 1. Belongs to the class directly | 1. Belongs to the class indirectly |
| 2. Cannot be invoked through instantiated objects | 2. Can be invoked through instantiated objects |
| 3. Keyword this, when used inside the method, refers to the class | 3. Keyword this when used inside the method, refers to the object through which the method is invoked |
Points To Remember About Static Methods In JavaScript
1. A method can be made static by just prepending a static keyword to it.
2. Static method is a method of a class but not of the instantiated object.
3. Static method cannot be accessed by instantiated objects.
4. Static method can be accessed using the class name.
5. Technically speaking, the static method gets stored inside the class's constructor but not the class's prototype.
6. Static methods are not at all shared with instantiated objects.
7. Whenever a static method is defined, its memory is allocated only once, and the memory is independent of the number of instantiated objects.
8. Static methods are generally used to create an object containing default information or for creating utility functions.
9. Inheritance works for static methods too.
Static Properties
In JavaScript, apart from having static methods in a class, we can also have static properties in a class. Static properties differ from usual properties in the same way static methods differ from usual methods.
class Chat {
    static message = "Have a great day";
}
Accessing Static Property
Static Property in JavaScript can be accessed through the class name. For instance, in the above example, if we wish to access the static property message, then we would access it as Chat.message.
Inheritance of Static Methods and Properties
Even static methods and properties could be inherited.
class User {
    static score = 20;
    static sayHi() {
        return "Hello, you see I am inherited as well";
    }
}
class Customer extends User {
    // some code
}
Getter and Setter in JavaScript
The JavaScript Object Accessors are used to access and manipulate object properties i.e., the values associated with the JavaScript objects. The getter and setter methods in JavaScript are primarily used as object accessors. The getter and setter in JavaScript are used to alter the property values.
Accessor Descriptors
A Property Descriptor is a simple JavaScript Object associated with each property of the object that contains information about that property such as its value and other meta-data. Property Descriptors present in objects come in two main flavours: data descriptors and accessor descriptors. A data descriptor is a property that has a value, which may or may not be writable.
The Accessor Descriptors in JavaScript are properties described by a pair of getter-setter functions. The accessor properties do not have value and are not writable, instead, they have to get and set functions.
Note: Accessor descriptors are objects
An Accessor Descriptor may have:
get: It is a function without arguments. The JavaScript getter methods are used to access the properties of an object.
set: a function with one argument. The JavaScript setter methods are used to change the values of an object.
enumerable: It defined properties that can be viewed if it is iterated using the for.. in loop or an Object
configurable: It controls whether a property can be deleted from the object or whether its attributes can be changed.
JavaScript Getter (The get keyword)
The JavaScript get syntax binds an object property to a function that will be called when that property is looked up. In layman's terms, the JavaScript getter provides us with a way to define an Object's property. The JavaScript getter methods are mainly used to access the properties of an object.
Note: The Object's property's value does not get calculated until it is accessed.
Syntax:
{ get prop()  {...} }
{ get [expression]() {...}}
prop: It is the name of the property that is used to bind to the provided function.
expression: We can also use expressions for a computed property name to bind to the given function. It is an ES6 addition.
// Declaring a class Person
class Person {
    // Construct to assign the name attribute
    constructor(name) {
        this.name = name;
    }
    // Accessing name attribute using getter
    get name() {
        return this.name;
    }
}
JavaScript Setter (The set Keyword)
The set syntax binds an object property to a function to be called when there is an attempt to set that property.
The JavaScript set executes whenever a particular property is altered. Generally, the setters in JavaScript is used in correspondence with getters to create a type of pseudo-property. The JavaScript setter methods are used to change the values of an object.
{ set prop(val) {...} }
{ set [expression](val) { ...} }
prop: The name of the property to bind to the given function
val: An alias for the variable that holds the value attempted to be assigned to prop.
expression: From ECMAScript 2015 onwards, we can also use the expressions for a computed property name to bind to the given function.
class Person {
    constructor(name) {
        console.log(`Constructor is called`);
    }
    set name(name) {
        this.name = name;
    }
}
Enumerable
A JavaScript Object is an unordered list of key-value pairs. Thus, for..in loops are generally used to access the properties of the objects. The enumerable attribute in javascript is used to determine if a property is accessible when the object's properties are enumerated by the for..in loop.
Note: By default, all object properties created by initializer o assignment are enumerated.
const student = {
    firstName: 'Peter'
    lastName: 'Parker'
};
student.age = 22;
for (const key in student) {
    console.log(key);
}
In the above example, the properties firstName lastName is created by the initializer and the property age is created by assignment. Thus all three will be enumerable and therefore will be accessible to the key in the for..in loop.
How to change the enumerable attribute of a property?
The internal enumerable attribute of a property can be changed by using the Object.defineProperty() method.
// Creating an object named 'student'
const student = {
    firstName: 'Peter',
    lastName: 'Parker'
};
// assigning a new property 'age' to student object
student.age = 22;
//Setting the 'enumerable' property for the 'lastName' false
Object.defineProperty(student, 'lastName', { enumerable: false});
// iterating through the 'student' object
for (const key in student) {
    console.log(key);
}
Configurable
The configurable attribute in JavaScript can modify the behaviour of the object's properties. It can make them non-enumerable, non-writable or even non-configurable. Configurable properties are the only ones that can be removed using the delete operator. By default its value is true.
The JavaScript object's properties can be deleted or modified only if the configurable attribute for the object is true, otherwise, we cannot alter the attributes of the object.
// Creating 'student' object
const student = {
    firstName: 'Peter',
    lastName: 'Parker'
};
student.age = 22;
// Setting 'configurable' attribute for 'lastName' of the student
Object.defineProperty(student, 'lastName', {configurable: false});
// Deleting lastName of the student object. It will return an error as the 'configurable' attribute is set to be false.
delete student.lastName; // Error
Functions vs Getters
The prime difference between the function and getters is that in the function call we are accessing the function whereas, in the getter call, we are accessing the property. Thus the getter syntax turns out simpler and more readable than the function.
Accessing Object attribute using function:
// Creating Student object
const Student = {
    firstName: "Peter",
    lastName: "Parker",
    rollNo: 10,
    displayName: function() {
        return this.firstname+ " " +this.lastName;
    }
};
console.log(Student.function());
Data Quality while using Getters and Setters
The Getters and Setters are used to secure better data quality. The getter and setter methods in JavaScript provide centralized control of how a certain field is initialized and provided to the user, thus making it easier to verify and debug.
// Creating JavaScript 'person' object
var person = {
    language: "JavaScript",
    get lang() {
        return this.language.toLowerCase();
    }
};
console.log(person.lang);
Object.defineProperty() in JavaScript
The Object.defineProperty() method in JavaScript is used to define a new property directly on an object. The Object.defineProperty() returns an object. It is generally used to change the flags of the attributes.
Syntax:
Object.defineProperty(obj, prop, descriptor);
obj: It is the Object on which the property is defined
Prop: It is the name of a property to be defined or modified
Descriptor: It is the descriptor for the property being defined or modified.
// Creating JavaScript Object 'Student'
const student = {
    firstName: 'Peter',
    lastName: 'Parker'
};
student.age = 22;
// Defining a new property 'city' for student object and assigning it the value 'California'
Object.defineProperty(student, 'city', {value: 'California'});
student.city; //California
Reasons to use Getters and Setters
Accessors and Mutators method encapsulate our classes, keeping them safe by hiding unnecessary implementation details and only modifying certain values.
Get and Set methods have slightly simpler syntax and also allow us to recognize their purpose at a glance.
The syntax for getters and setters is similar to that of the javascript method thus it is easy to learn.
Smarter Getters/Setters
Getters and setters in JavaScript can be used as wrappers over "real" property values. This is done to gain more control over operations with them using which we could add constraints etc.
let user = {
    get name() {
        return this._name;
    },
    set name(value) {
    // This will return an alert if the length of the value is less than 4
    if (value.length < 4) {
        alert('Name is too short, need at east 4 characters');
        return;
    }
    this._name = value;
    }
};
user.name = "Peter";
alert(user.name);
user.name = "p";
Using for Compatibility
The Getter and Setter in JavaScript can be used to allow to take control over a regular data property at any moment. It is done by replacing the regular data property with a getter and setter and altering its behaviour.
// Creating User object with 'name' and 'age' properties
function User(name, birthday) {
    this.name = name;
    this.birthday = birthday;
    Object.defineProperty(this, "age", {
        get() {
            let todayYear = new Date().getFullYear();
            return todayYear - this.birthday.getFullYear();
        }
    });
}
let john = new User("John", new Date(1992, 6, 1));
alert(john.birthday);
alert(john.age);